 En
En
 Es
Es
The platform role model controls user access to features.
By default, preconfigured roles are available in the platform: administrator, advanced user, and user. You cannot change the settings of these roles. For more information about the capabilities of each role, see the User permissions article.
You can create your own ( user) role with flexible access to the platform features. This article contains a description of the platform role model and instructions on how to manage roles.
Function limitations
In the current implementation:
- it is recommended to use custom roles to familiarize yourself with their capabilities and test role-based access to the platform;
- assigning custom roles to users from LDAP is not supported.
The role model requires at least one user with a preconfigured administrator role. This will allow you to restore access to the platform in case of insufficient permissions for the user role. If access to the administrator account is lost, contact technical support.
Role model terminology
User — any subject (including administrator) working with the system.
Administrator — a privileged user who has rights to configure roles.
Role — a set of objects and rights.
Rights (privileges) — permissions to perform certain actions with objects.
Object — a managed entity to which rights apply. In VMmanager, objects include virtual machines (VMs), clusters, and systems.
System — а part of the platform that does not involve defining rights for individual objects. In most cases, systems in VMmanager are sections of the platform. For example, in the role settings, you can completely deny access to the Scripts section, but you cannot deny access only to individual scripts.
Preconfigured roles — unchangeable roles that exist in the platform by default - administrator, advanced user, user.
User role — a role created by the administrator.
Work logic
The administrator can create, modify, and delete only user roles. Modifying preconfigured roles is not supported.
Roles can be assigned to specific users or groups. A user can be assigned either one of the preconfigured roles or one or more custom roles. If multiple user roles are assigned to a user, their rights are combined.
The following rights can be set for each object:
- allowed — action with the object is allowed for members of this role;
- not allowed — default state. An action with an object is not allowed for that role, but can be issued through another role. For example, if one of the user roles allows VM creation and the other role does not, the user will be able to create VMs;
- forbidden — action with the object is strictly forbidden. Prohibited has the highest priority when combining the rights of several roles. For example, if one of the user roles allows the creation of VMs and the other one forbids it, the user will not be able to create VMs.
Objects and rights for which a role is configured:
Role management
To manage roles, go to Users sections → Roles tab.

Tab interface
Role creation
To create a role:
- Click Create a role button.
- Enter the Name of the role.
- Enter the arbitrary role Description.
- Select the objects and rights that will be available to participants in this role:
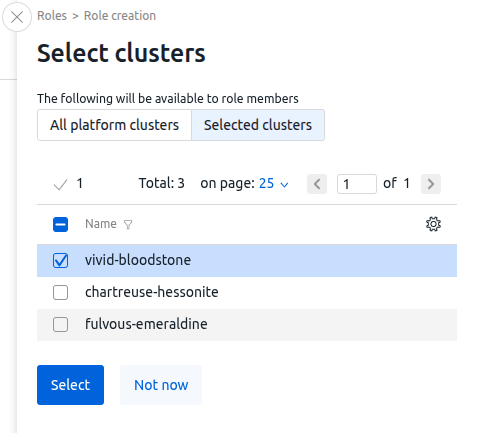
- In the Clusters section:
- Click Select clusters button.
- Select the clusters that should be available in the role:
- All platform clusters;
- Selected clusters → check the required clusters in the list.
- Click Apply (Select) button.
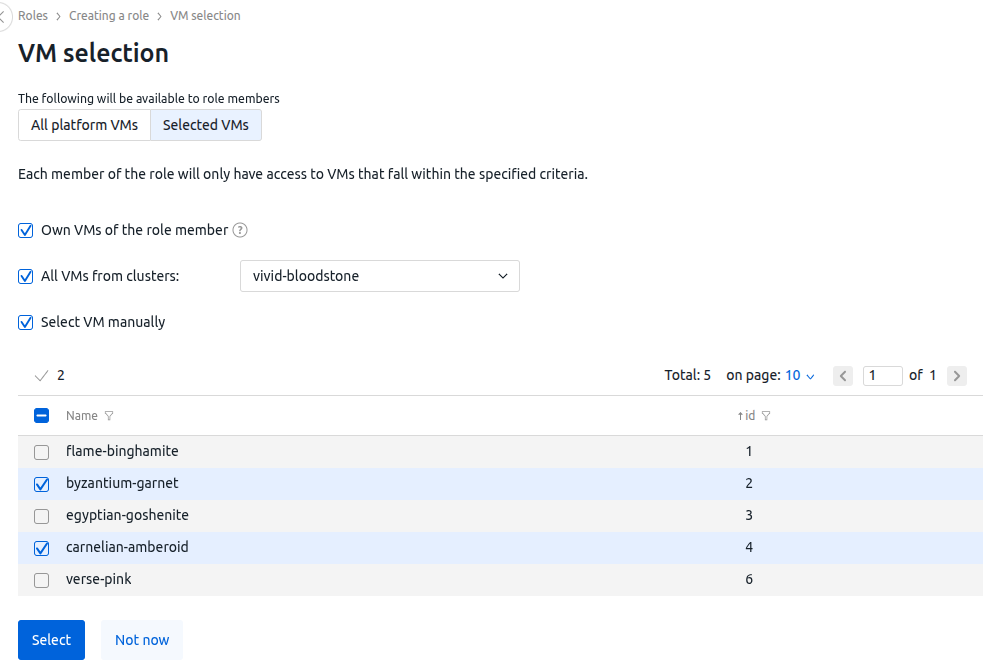
- In the Virtual machines section:
- Click Select VMs button.
- Select the VMs that should be available in the role:
- All platform VMs;
- Selected VMs:
- Own VMs of the role member;
- All VMs from the cluster → select clusters;
- Select VM manually → check the required VMs in the list.
- Click Select button.
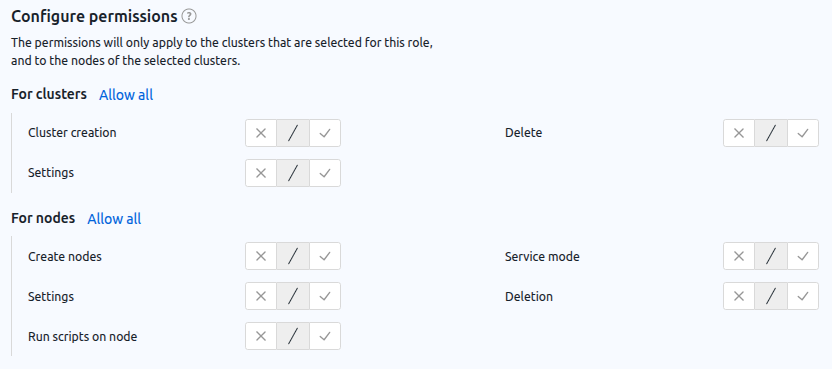
- Configure permissions for each object:
- by default, all permissions are set to "not allowed" —
 icon;
icon; - to set the value to "allowed", click the
 icon;
icon; - to set the value to "forbidden", click the
 icon;
icon; - to set all permissions to "allowed”, click the Allow all button.
- by default, all permissions are set to "not allowed" —
- In the Clusters section:
- Click Create a role button.
Role change
To change the role settings:
- Select a role on the left side of the window.
- Open the Settings tab.
- Make the necessary changes.
- Click Save button.
Managing role participants
To manage role participants, select the role on the left side of the window and go to the Role participants tab.
To assign a role to users:
- Open the Users tab.
- Click Add user button.
- Select users from the list.
- Click Add button. You cannot assign a role to an account through which you logged in to the platform.
To remove a user from the role, in the row with the user, click the  icon → Remove from role.
To assign a role to groups of users:
- Open the User groups tab.
- Click Add group button.
- Select groups from the list.
- Click Add button.
To remove a group from the role, in the row with the group, click the icon → Remove from role.
Role deletion
To delete a role:
- Select a role on the left side of the window.
- Open the Settings tab.
- Click Delete button.
Log files
Service logs can be useful for identifying problems with the role model:
- auth — authorization service — is saved in stdout of the auth container;
- vmr — role management service — is saved in stdout of the vmr container.