 En
En
 Es
Es
IPmanager is a control panel that can be used as a centralized web-interface for IP address management and allocate IP addresses to servers. IPmanager features:
- an IP address will be allocated only to one server;
- it helps configure a name server for PTR management.
A control panel administrator can allow a user to use specific ranges and groups of IP addresses. So, an administrator in IPmanager can allocate a network cluster for every user.
For more information on how to install IPmanager please refer to the article Setup and configuration.
Integration parameters in DNSmanager
Navigate to Integrations → IPmanager
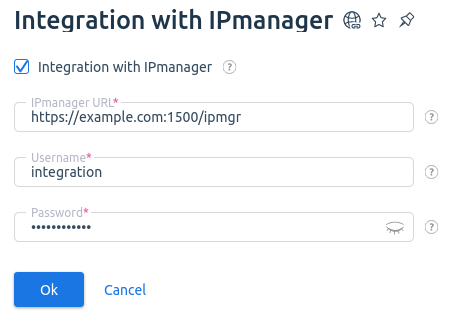
- Integration with IPmanager — check the box to select a source of IP addresses that will be allocated to virtual servers in DNSmanager. Selecting the checkbox will allocate IP addresses from IPmanager. Otherwise, the IP addresses will be allocated from a pool of IP addresses in DNSmanager (Settings → Panel addresses);
- IPmanager URL — enter the full URL to IPmanager.
- Username — enter the username of the user account in IPmanager. Create the account in IPmanager before you start the integration process.
- Password — enter the user password.
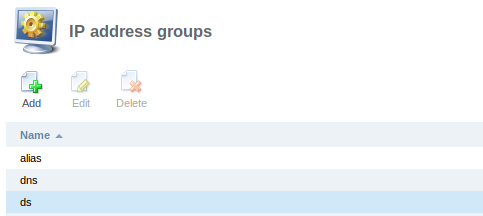
IP address group management
DNSmanager uses only one type of IP addresses — dns. You need to add it in IPmanager→ Settings → IP address groups:
To use the IP address from a certain group, set permissions for the user account which is used for integration with DNSmanager. Log into IPmanager as Admin → Main→ User→ Permissions:
An empty list of permissions indicates that the user account cannot use any ranges of IP addresses.