To add ASSIST, you need to configure the settings on the payment gateway side and add the module in BILLmanager.
Configuring the payment method
Log in to ASSIST and enter the following configuration details:
- URL to send results: https://<URL_BILLmanager>/mancgi/assistresult.
- Secret word.
Configuring BILLmanager
The module is installed from the latest available version of the product and requires an update of the BILLmanager platform, because the module version cannot be higher than the platform version.
To create a payment module, enter Provider → Payment methods → click Add. The payment module adding wizard consists of the following steps:
- Select a payment methods: "ASSIST".
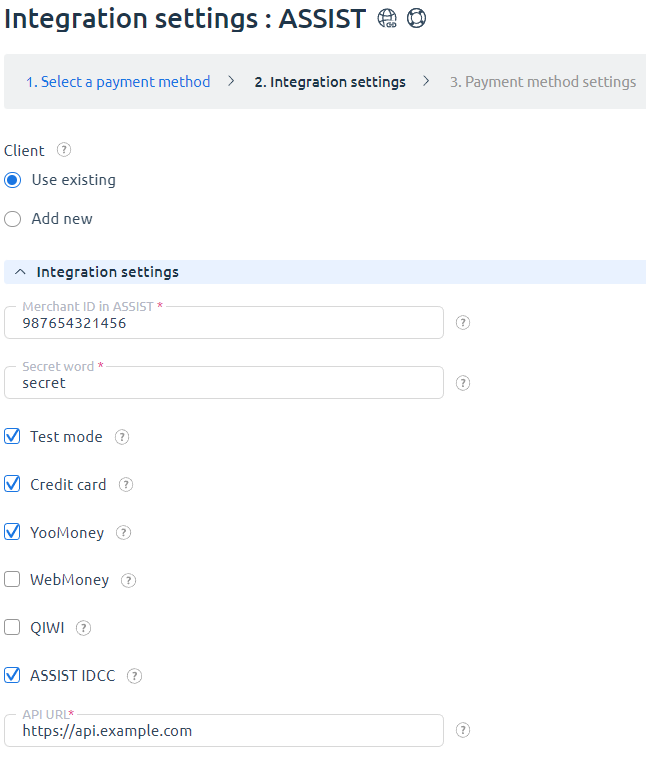
- Integration settings. Specify the data for integration:
Activate the Add New Client option to display a link to register with the handlers system.
Complete the form using the details of an existing client in the handlers system:
- Client — select the existing account or register a new one. If you choose "Use existing", enter the following details:
- Merchant ID in ASSIST — shop unique identifier in ASSIST.
- Secret word — enter a secret word inside your ASSIST account.
- Test mode —select the check box to activate a test mode for this payment method. The system wont charge client, but will process the payments correctly.
- Payment method — select a payment method.
- API URL — payment gateway API. You can get it from ASSIST.
- Payment method settings. Configure internal (within BILLmanager) parameters of the service payment module. For more details, see How to add a payment gateway module.

Selecting "Add new" will redirect you to the ASSIST registration form.
Additional information
Refund
Refund is not supported.
Logging
ASSIST has the following log files:
- /usr/local/mgr5/var/pmassist.log — configuration details of the payment method.
- /usr/local/mgr5/var/assistpayment.log — payment log.
- /usr/local/mgr5/var/assistresult.log — responses from the payment gateway.
 En
En
 Es
Es