A hosting company can integrate its billing platform with IPmanager to provide dedicated IP addresses with shared hosting services.
IP addresses won't be allocated from IPmanager in two cases:
- Tariff settings don't allow to order dedicated IP addresses for shared hosting. Clients in ISPmanager can use only the shared IP address of the server.
- Integration is set up with ISPmanager Lite. ISPmanager Lite doesn't allocate dedicated IP addresses to users.
In these cases, the integration with IPmanager can be "dummy". This means that you can add integration under a user who has no IP access configured. You can create such a user in IPmanager or in ISPmanager Business.
ISPmanager configuration
Creating a "dummy" user in ISPmanager Business
To create a user in ISPmanager Business:
- Enter Accounts → Users → Add . Fill in the required fields to create the user. Read more in .
- Enter Accounts → Users → select the created user → Perm. → IP Addresses → Disable .
For more information about ISPmanager settings, read the official documentation.
IPmanager configuration
You can install IPmanager on the same server with BILLmanager or on a separate server. After you have installed IPmanager, login to the control panel as an administrator, create a user account, and set up the network.
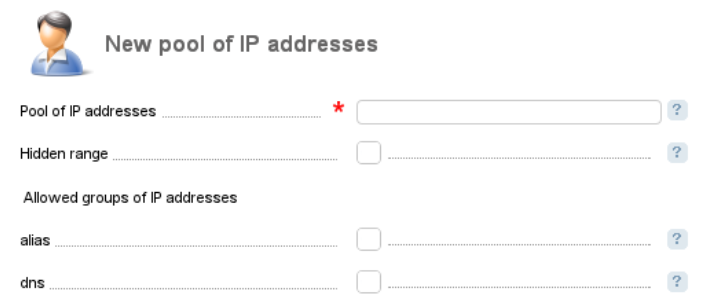
Navigate to Main → Networks → Add, new network IP addresses will be allocated to shared hosting users.
Navigate to the Main → Users and create a new user (with "User" permissions) to set up the integration.
Click Permissions in the Users module to choose IP addresses (a single IP address, an IP range, or subnets) that will be allocated to this user.
Example: the service provider has 133.31.223.0/24. For shared hosting, he needs only one range 133.31.223.0-133.31.223.128. So, he/she adds 133.31.223.0/24 in IPmanager but the user will have permissions only on 133.31.223.0-133.31.223.128.
Select the alias checkbox in Allowed groups of IP addresses. Only this type of IP addresses is used for Shared hosting.
BILLmanager configuration
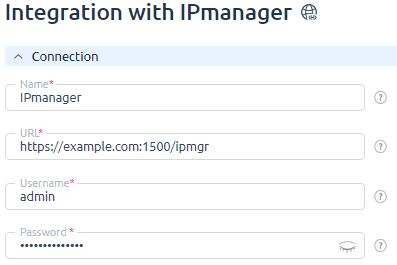
Navigate to Integration → IPmanager. The integration form consists of two sections — "Connection" and "Synchronization of IP addresses".
Connect to IPmanager
- Name — enter any name for this integration.
- URL — enter a full path to IPmanager control panel. Make sure it is accessible from the server with BILLmanager.
- Username — enter the name of the IPmanager account with "User" permissions. By using this username, BILLmanager will get/return IP addresses from IPmanager.
- Password — enter the user password.

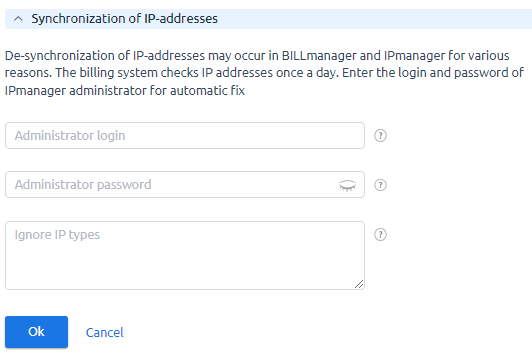
Synchronization of IP addresses

Statuses of IP addresses in IPmanager and BILLmanager will be compared during synchronization:
- If the IP address is already used in IPmanager but does not exist in BILLmanager, BILLmanager will send a request to IPmanager to release it.
- If the IP address is free in IPmanager but is assigned to the service in BILLmanager, the billing platform will mark it as "allocated" in IPmanager.
Since synchronization is performed with the username that was specified during integration, BILLmanager can release and use only those IP addresses that belong to this user in IPmanager. That's why there may be insufficient permission to change IP status. On the synchronization form, you can enter the IPmanager administrator login and password to change statuses regardless of user privileges.
If you don't want all of the IP addresses to be synchronized, check the Ignore types of IP addresses box. Types of IP addresses are IP groups that can be added in IPmanager → IP groups. Only alias IP addresses are used for Shared hosting in BILLmanager.
For IP synchronization we don't recommend specifying credentials of IPmanager administrator, especially if in IPmanager there are IP addresses which were allocated manually (not by BILLmanager) and those IP addresses are not bound to services in the billing platform.
Otherwise, the IP addresses will be released by BILLmanager automatically.
Every day at 03:15 a.m. the fix.moduleip cron job starts synchronization of IP addresses.
 En
En
 Es
Es
