 En
 Es
This is the documentation for the deprecated product BILLmanager 6 Startup and BILLmanager 6 Advanced. It is no longer updated and may be irrelevant. Documentation for the current version of BILLmanager can be found in the BILLmanager 6 section.
To add Stripe, you need to configure the settings on the payment gateway side and add the module in BILLmanager.
| Payment methods support | ||||
|---|---|---|---|---|
| Bank cards | Cash | E-wallets | Mobile payments | Online banking |
 |  | | | |
| American Express, Diners, Discover, JCB, Maestro, Mastercard, Union Pay. | Alipay, WeChat Pay, Cash App Pay, Amazon Pay. | |||
| Supported features | ||||
Payments return | Recurring payments | Subscriptions | ||
| | | ||
Configuring the payment method
- Configure webhook: Go to Developers → Webhooks → Add endpoint. For the Endpoint URL, use the address of the billing platform CGI-script, eg.:
https://domain.com:1500/mancgi/stripewebhook. Enable charge.succeeded, charge.failed, setup_intent.succeeded for notifications:
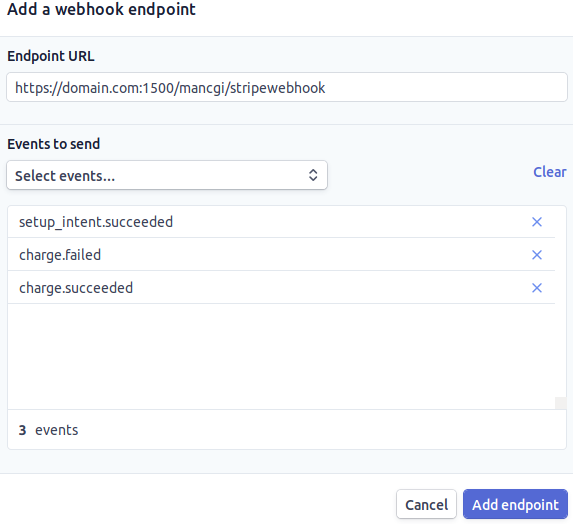
If you enter the HTTPS protocol in the Endpoint URL field, the payment system will check how secure the connection with the specified server is. Make sure that the server domain name has a valid SSL-certificate. - Create an API key with the required access rights: Developers → API keys → Create restricted key. For the module to function correctly, grant the token the following privileges:
- Charge and Refund — READ+WRITE;
- Customer Session — READ+WRITE;
- Customers — READ.
- Enable due payments notifications in Settings → Stripe apps → Billing → Subscriptions and emails → Manage payments that require 3D Secure → Customer emails → Send a Stripe-hosted link for cardholders to authenticate when required . This option is used when a client enables recurrent payments with cards that require confirmation of every operation. When activating the payment, the client will receive a notification with payment confirmation instructions. The payment will be accepted in BILLmanager after confirmation.
- Specify the account name in Stripe: Settings → Business settings → Your business → Account Information → Account name.
Configuring BILLmanager
To create a payment module, enter Provider → Payment methods → click Add. The payment module adding wizard consists of the following steps:
- Select a payment methods: "Stripe".
- Integration settings. Specify the data for integration:
Activate the Add New Client option to display a link to register with the processing module's system.
Complete the form using the details of an existing client in the processing module's system:
- Payment method — types of payments available to the client on the Stripe Checkout page. Multiple selection is available. For example, bank cards, Amazon Pay, Alipay, WeChat Pay.
- Secret Key — enter the secret key to API in Stripe.
- Publishable Key — enter the public key to API in Stripe.
- Logo URL — enter the provider URL. The client will see this logo on the payment page. The recommended size is 150x50 px.
- Recurring payments — select the checkbox to enable recurring payments. Recurring payments are available only for payment methods via card, Cash App Pay, Amazon Pay. When setting up automatic payment for clients the system will automatically make a payment for 1 $ to ensure the credit card is valid. After the recurring payments are set up, the payment will be canceled.
- Payment method settings. Configure internal (within BILLmanager) parameters of the service payment module. For more details, see How to add a payment gateway module.
Additional information
Payment refunds
To allow for refunds navigate to Provider → Payment methods → select the payment method → click Edit → Refund and cancellation of payments option block→ check the Allow refund box. Refunds are supported for payments with the "Paid" status.
Logging
Stripe has the following log files:
- /usr/local/mgr5/var/pmstripe.log — configuration details of the payment method;
- /usr/local/mgr5/var/stripepayment.log — payment log;
- /usr/local/mgr5/var/striperesult.log — credit payment log;
- /usr/local/mgr5/var/striperecurring.log — auto-payment activation;
- /usr/local/mgr5/var/stripesubscription.log — auto-payment configuration;
- /usr/local/mgr5/var/stripewebhook.log — Webhook log.