 En
En
 Es
Es
With the DC Map module, you can create a map of a data center (DC). The map shows:
- location of racks and floor-mounted UPS;
- location of structural elements of the data center — walls, doors, cold and hot corridors;
- equipment status;
- server temperature.
A separate data center map is created for each location.
Installing the module
To install the module, click  in the right menu → Modules → DC map → click Install.
After installing the module, the DC map section will appear in the platform.
Module interface
To work with the module, enter the DC map section.
The interface of the module consists of tabs:
- Build DC — create and edit a map;
- Equipment status — monitor equipment status;
- Temperature — monitor server temperature.
Map tools:
-
 — fit the map to the screen;
 -
 — zoom out;
 - 100% — displays the current map scale. When you click on the field, the scale returns to 100%;
-
 — zoom in;
 -
 — display the legend.
Creating a DC map
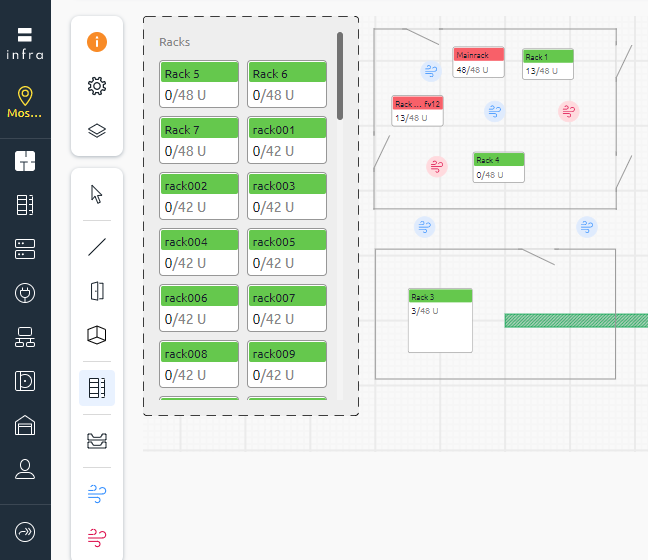
To create or edit a map, click the Build DC button.
Adding equipment
If the location contains objects that are not present on the map, the number of such objects will be displayed next to the tab name.
The objects that you can add to the map are displayed in the left part of the window.
Adding design elements
To add a data center design element to the map:
- Click on the icon in the left menu:
-
 — wall;
 -
 — door;
 -
 — room;
 -
 — racks and PDU;
 -
 — cable tray/trace;
 -
 — cold aisle;
 -
 — hot aisle .
-
- After the item appears on the map, move it to the desired place.
The interface of the editing DC map window
Auxiliary lines
You can turn on and off the display of auxiliary lines. To do so, click on the  icon → Auxiliary lines.
In the DC map module, there are three types of auxiliary lines:
- lines that show the exact distance between the items as they are moved;
- guide lines that appear when dragging if an item has one of its sides coinciding with other item along the X or Y axis;
- indentation lines that appear between the two selected items and show the indentation to the right and bottom of the top left item.
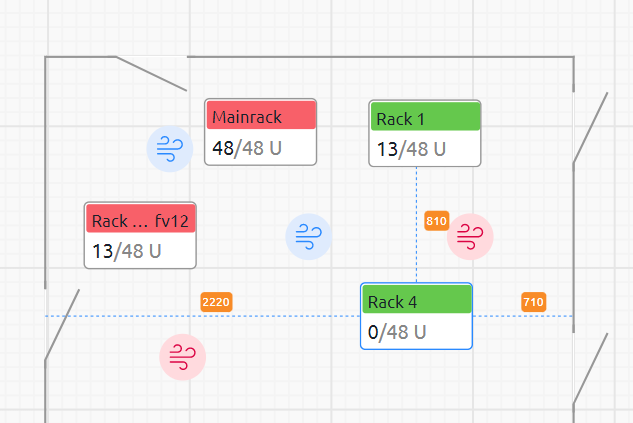
Indentation auxiliary lines
Moving, stretching and rotating items
You can enable or disable snapped drawing in the grid. To do this, click the icon → Snap to grid.
When snap to grid is active:
- all elements are moved by distances divisible by the grid size;
- the angles of rotation of the elements vary in multiples of 15 degrees.
To temporarily disable snap drawing, hold down the Shift key.
To change the length or width of an element, drag one end of the line.
To rotate an item, select the item and click on the icon  .
.
To rotate an item, select the item and click on the icon  or press the Delete key.
Moving and scaling the field
To move the field, click on the free area, hold down the left mouse button and move the mouse. You can also use keyboard shortcuts:
- moving the field up and down: mouse wheel;
- moving the field left or right: Shift + mouse wheel;
- zoom: Ctrl + mouse wheel.
Selecting items
You can add the items one by one or in groups. To add the item to the selection, hold the Ctrl key and click on the item. If you select two items, lines will appear between them with adjustments for the indentation of one item from the other. If you click on the displayed distance, a drop-down list appears with the option to enter the exact distance.
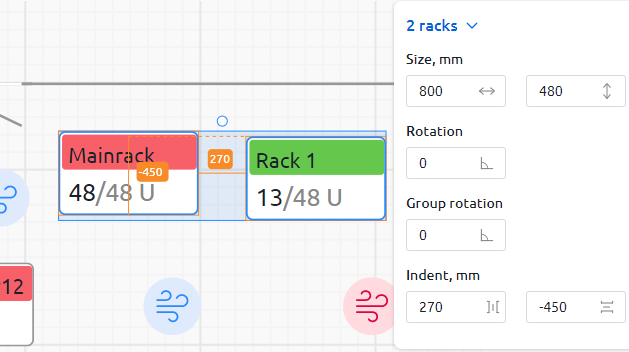
Display of the exact distance between two items
To clear the selection, hold Ctrl and click on any empty region of the map.
If you hover over a selected item, a pop-up menu appears with options to copy, lock, unlock, unlock, delete items, and an icon to deselect.
When you have finished editing the map, click Save Changes.
Monitoring equipment status
To monitor, go to the Equipment status tab.
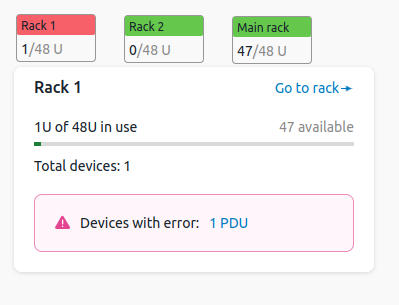
The objects on the map display the following information:
- racks:
-
 — errors have been detected in the operation of the devices in the rack;
 -
 — the equipment in the rack is operating without errors;
-
-
- name;
- size in units;
- number of occupied units;
- status:
- floor-mounted UPS:
- — there is no communication with the device;
- — the device is active.
-
-
- name;
- remaining operating time in autonomous mode, min;
- load, %;
- status:
When you move the cursor over an object, a window with detailed information about its status and a link to the object card is displayed.
Temperature monitoring
Temperature monitoring is only available for servers with BMC Redfish.To display server temperature data on the data center map, configure server connections to the BMC and equipment status notifications.
To monitor, go to the Temperature tab.
Comments to the object color scheme:
-
 — permanently exceeded — the server rack temperature has been above range for the specified time or longer;
 -
 — briefly exceeded — the server rack temperature has been above range for less than the specified time;
 -
 — within range — the temperature of the server in the rack is within acceptable limits;
 -
 — temperature is not monitored.
For example, the platform administrator has configured a setting for the "Temperature out of range for 15 minutes" notification. If the BMC poll shows that the temperature has been exceeded, the color of the unit will change to orange. If the temperature does not decrease to the permissible value within 15 minutes, the color of the unit will change to pink.
If a rack contains multiple servers with different temperature statuses, the color of the rack on the map will take on the color of the worst status. For example, two servers in the rack had briefly exceeded the temperature and one had exceeded the temperature for an extended period of time. The color of the rack will change to pink.
When you move the cursor over a rack, a window with detailed server temperature information and a link to the rack card is displayed.
Useful tips