The "Server auto-add" module adds new servers to DCImanager 6. The module operates in the background mode. Depending on the module settings, the platform communicates with the server, which is being added, via PXE or BMC. The server is added to DCImanager 6 automatically when it is turned on or rebooted. When adding a server, DCImanager 6 performs its diagnostics without clearing the disks.
If the server is connected to the switches, the module will add connections to the server settings. Additionally, in the module settings you can allow searching for BMC connections. If found, BMC will be reconfigured.
When auto-add via BMC, the hostname value will be used as the server name.
When auto-add via BMC Redfish, the server platform is determined by the value of the Model parameter from the FRU information. If such a platform does not exist in DCImanager 6, it will be automatically created.
In the current version, DCImanager 6 detects server connections to the switches that use handlers:
- Arista (eAPI);
- Cisco Catalyst (SNMP);
- Cisco Nexus (NX-API);
- D-Link (SNMP);
- Extreme Network EXOS (SOAP HTTP);
- HP (SNMP);
- Huawei (SNMP);
- Juniper (NetConf);
- Juniper ELS (NetConf);
- MikroTik CRS3XX (RouterOS API).
Module installation
- Enter
 → Modules → Server auto-add → Install button.
 -
After installation, press Go to settings.
Module configuration is not available on locations without available physical networks. -
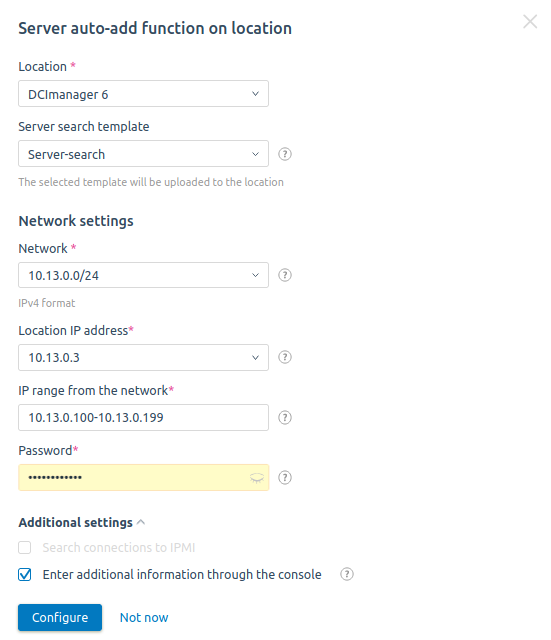
Configure the auto-adding settings:
-
via PXE:
- Press Configure.
- Select the Location.
- Select the Server search template. We recommend using the "Server-search6" template for the module to work correctly.
- Select the Network. We recommend using a network with private IP addresses without access to the Internet. IP addresses from the range of this network will be temporarily issued to all added servers. The network must include the IP address of the location.
- Select the Location IP address used by the DHCP server. The IP address must be in the network selected above for assigning temporary addresses.
- Specify the IP range from the network. Free IP addresses from this range will be temporarily issued to the added servers.
- Enter a temporary Password with which you can log on to the added server.
-
For the module to detect server connections to BMC:
- Enable the Search connections to BMC option.
-
Select an existing IP pool for BMC or create a new one.
IP addresses from the pool will be allocated and user password for connection will be changed for the BMCs found. Other users will be disabled.
-
If necessary, enable the option to Enter additional information through the console. In this case, a script will be run on the added servers to enter the server name, server rack, unit and serial number. To specify this data, you will need to connect to the server via SSH, BMC or KVM.
An example of data entryEnter following data Rack number: R4 Unit number: 6 Serial: 123-456-7890 Label: Server42Comments to the example - Press Configure. DCImanager 6 will start loading the server auto-addition template at the selected location.

-
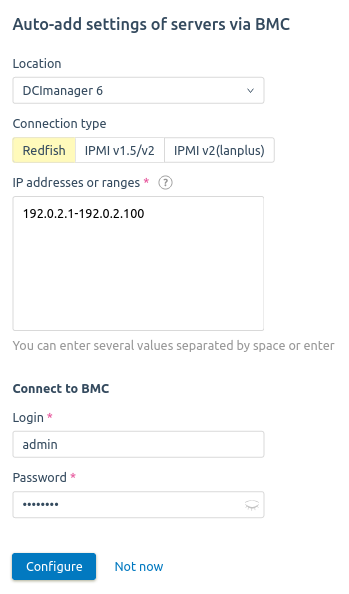
via BMC:
- Press Configure.
- Select the Location.
- Select the BMC Connection type:
- Auto — autodetect connection type. If this option is selected, the platform will consistently connect to the server using Redfish, IPMI v2(lanplus), IPMI v1.5/v2 protocols;
- Redfish;
- IPMI v1.5/v2;
- IPMI v2(lanplus).
- Specify the IP addresses or ranges for servers, which are being added, in IPv4 format. You can enter:
- an individual IP. For example, 192.0.2.1;
- an IP subnet. For example, 192.0.2.0/24;
- an address range. For example, 192.0.2.1-192.0.2.100.
- Specify the BMC connection settings:
- Login.
- Password.
- Press Configure.

-
Managing module settings
Via PXE
To manage the auto-addition settings, enter  → Modules → Server auto-add → Go to Settings.
To add settings for the location, click Configure.
To disable server auto-addition at the location, select the location →  menu → Disable the search option on the location or click
  on the settings bar.

Section of module settings management
Via BMC
To manage the auto-addition settings, enter  → Modules → Server auto-add → Go to Settings.
To add settings for the location, click Configure.
To start the auto-adding, click Start server search.
To disable server auto-addition at the location, select the location →  menu → Disable the auto-add setiings.

Section of module settings management
Managing added servers
To view the added servers, press Servers → Found automatically tab.
To re-check the server connections, click the Start searching for new connections (PXE) button.
To search for servers via BMC again, press Start server search (BMC).
To add connections manually:
- to BMC (Intel AMT) — press add in the Power column;
- to the switch — press add in the Network column.
To put the server into operation:
- Press Put into operation.
- Specify the required settings. Read more about settings in Adding a server.
- Press Put the server into operation.
 En
En
 Es
Es