 En
En
 Es
Es
You can migrate a server with a platform to a virtual machine (VM) in the cluster that the platform manages. This will:
- save resources — you will not need a separate server for the platform;
- increase system reliability — if the platform is placed in a high availability cluster, in case of platform node failure, its operation will be restored on another node;
- flexibly scale the platform — it will be possible to add resources for the platform server as for a regular VM.
The VM to which the platform is migrated is called a master VM.
Limitations
Platform requirements
In the current implementation the migration of the platform installed on AlmaLinux 8 OS is supported.
Cluster requirements for migration
The cluster to which the platform is migrated must have the following characteristics:
- virtualization type — KVM;
- network setting type — Switching or IP-fabric;
- pool from which the new platform IP address will be allocated is available in the cluster;
- OS template installed on the server with the platform is available in the cluster;
- the cluster node has enough resources to create a VM with the platform;
- the value of RAM, vCPU and disk space overselling on the node does not exceed 1.
Requirements for OS template names
When creating a VM with a platform, an OS matching the OS of the source server is installed on it. The appropriate OS version is determined by the template name:
- First, a template specifying a suitable minor version (e.g.,
AlmaLinux 8.10) is used. If such a template is not found, then a template specifying a major version (e.g.AlmaLinux 8) is used. - A template with a space in the OS name is considered more preferable. For example, the
Alma Linux 8template is considered more appropriate than theAlmaLinux 8template.
Logic of operation
Migration process
The vm-mover service performs the main actions on platform migration. The service is located in the vm_box container and is copied to the /opt/ispsystem/vm-mover/ directory on the source server with the platform. During the migration process, the service:
- Prepares a VM for platform operation.
- Waits for current tasks to complete and blocks new ones from starting until the migration is complete.
- Creates an archive with Docker images of the platform.
- Transfers to a prepared VM:
- platform installer;
- Docker image archives;
- contents of the /opt/ispsystem/vm/ directory;
- platform patches.
- Stops and disables the platform on the source server.
- Starts the installation of the platform on the VM.
- Statistics data is not automatically migrated, you can migrate it manually. For more information, see Migrating statistics data.
- Platform backups are not migrated. Restoring a master VM from backups created on the source server is not supported.
- During migration, the platform is unavailable and operations cannot be performed on it. Canceling a migration operation is not supported.
The migration process will create a VM for the platform with the following characteristics:
- vCPU, RAM, disk space — when migrating, you can choose configurations based on the number of VMs the platform will manage:
- up to 1500 VMs — 4 vCPU / 8 GB RAM / 300 GB Storage;
- 1500 to 3000 VMs — 8 vCPU / 16 GB RAM / 600 GB Storage;
- 3000 to 15000 VMs — 32 vCPU / 64 GB RAM / 2 TB Storage; Configurations to manage more than 15000 VMs are not supported.
- OS — matches the OS on the source server;
- number of disks — 1;
- number of network interfaces — 1;
- number of IP addresses — 1;
- virtual networks — unsupported;
- IP address allocation via DHCP — unsupported;
- possibility to increase vCPU, RAM and disk space without rebooting; Increasing RAM without rebooting is only available in 1024 MB increments up to a maximum of 16 times.
- when migrating to a high availability cluster, the VM will be added to the recovery list.
Platform operation after migration
After the migration, the platform will be available with a new IP address allocated from the cluster pool. The access settings will remain the same. If necessary, you can change the IP address of the master VM to the address of the source server.
The node to which the platform will be migrated will be displayed in the list of nodes with the  icon. If this node needs to be rebooted, first migrate the master VM to another node.
Master VM will not be transferred by the balancer.
The vm-agent service on the cluster node monitors the operation of the master VM and restores it if necessary (for example, starts it if the VM is stopped). In case the master VM is in a high availability cluster, its recovery will be performed automatically by cluster services.
Starting the migration
- In the right menu, click the
 icon → VM with platform tab → Migrate platform to VM button.
 - Specify the VM parameters to be migrated:
- Cluster.
- Configuration depending on the number of VMs to be managed by the platform:
- Up to 1500 VMs — 4 vCPU / 8 GB RAM / 300 GB Storage;
- From 1500 to 3000 VMs — 8 vCPU / 16 GB RAM / 600 GB Storage;
- From 3000 to 15000 VMs — 32 vCPU / 64 GB RAM / 2 TB Storage.
- Node.
- VM disks distribution by storages.
- Network settings.
- Click Migrate platform to VM button → Start platform migration. A page with the migration status will open. If you close this interface tab, the migration will continue, but you will not be able to track its status in the interface.
- Wait until all migration steps are completed. In case of problems with the migration, the platform will be restored to the source server.
If the platform is migrated successfully:
- an e-mail will be sent to the administrator's e-mail address with information for accessing the platform;
- a message The platform has been migrated to the VM with a link to go to the platform interface will appear. When you open a link, your browser may display a warning about a possible security threat. This happens if the server uses a self-signed SSL certificate. You can connect a valid SSL certificate to the platform according to the instructions.
Managing VM with the platform
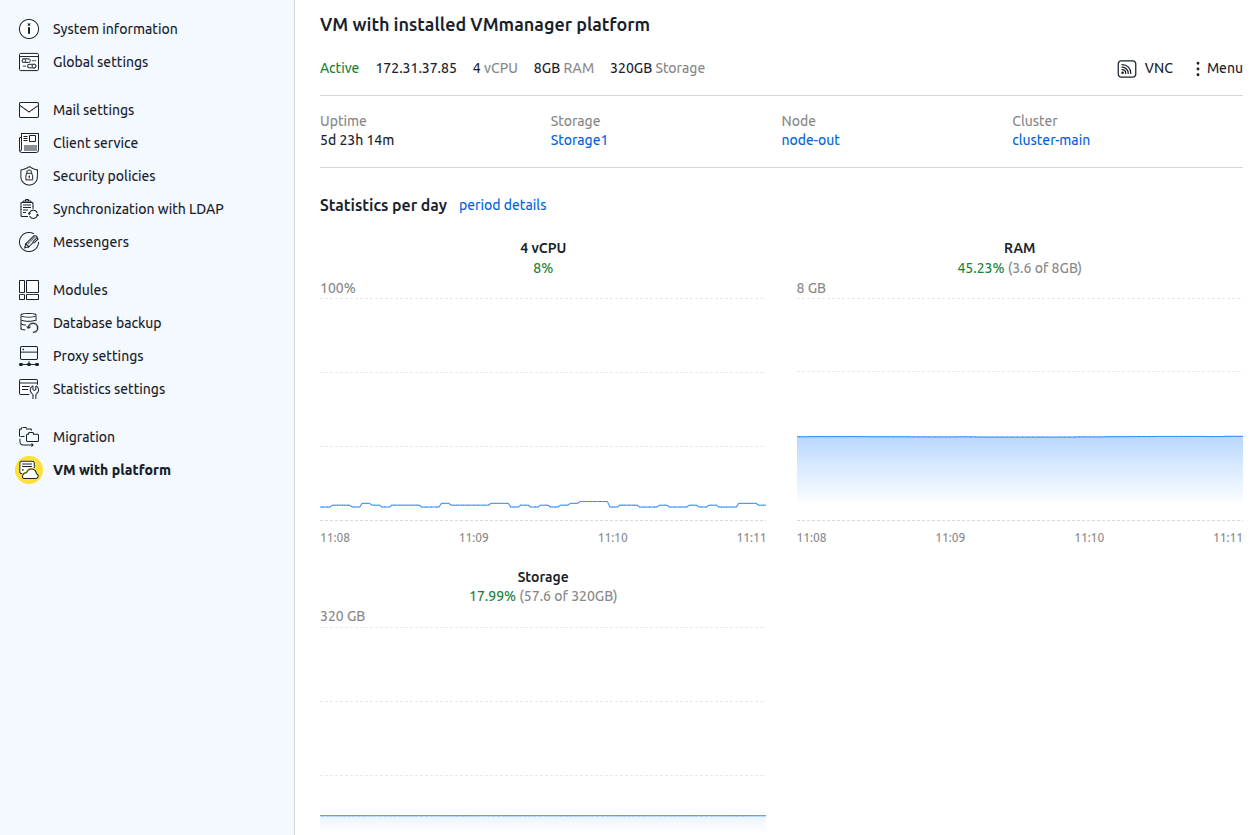
The master VM is not displayed in the common VM list and is not counted in the total number of VMs. To manage the master VM, in the right menu, click the icon → VM with platform tab. The tab contains information about the VM and current statistics of resource consumption. To view statistics for a specific period, click the period details button. To perform operations on the VM, click  Menu. Available operations:
- Migrate;
- VNC — connect to the VM via VNC;
- Change password;
- Change resources; After increasing the disk size, perform the instructions in the section Increasing the master VM disk size.
- Change IP address.
Tab interface
Actions after migration
Changing NS records
If the platform was accessed by domain name, change the A record on your NS server: change the IP address of the source server to the IP address of the master VM.
Migrating statistics data
Statistics data are not transferred automatically. To transfer them:
- Connect to the source server using SSH. For more information about connecting via SSH, see the article Workstation setup.
- Transfer the data using the mover-cli utility:
cd /opt/ispsystem/vm-mover && sh mover-cli.sh copy-backup-statistic --vm-ip <IP address of the master VM>
Connecting the source server as a cluster node
You can use the source server as a cluster node. To do this:
- Connect to the source server using SSH. For more information about connecting via SSH, see the article Workstation setup.
- Delete the platform files using the mover-cli utility:
cd /opt/ispsystem/vm-mover && sh mover-cli.sh destroy -
Remove the installed Docker images and containers:
docker system prune -a --volumes -f -
Uninstall the Docker software:
dnf remove docker-ce docker-ce-cli docker-ce-rootless-extras containerd.io - In the platform interface, connect the node following the instructions in the Managing servers in the cluster article.
Increasing the master VM disk size
When you enlarge a disk through the platform interface, only the block device size will change and the actual disk size will remain unchanged. To enlarge a disk partition:
- Connect to the master VM via SSH. For more information about connecting via SSH, see the article Workstation setup.
-
Install utilities to resize the disk:
dnf install cloud-utils-growpart -
Define the partition and file system type:
lsblk -fIn the example below, the partition is vda2 and the file system type is EXT4.
NAME FSTYPE LABEL UUID MOUNTPOINT vda ├─vda1 └─vda2 ext4 4a9ea381-1b1c-f135-a540-685a8d3e82f8 / -
Perform a partition extension:
growpart /dev/<partition_name> <partition_number>Comments to the command -
Change the size of the file system:
EXT4resize2fs /dev/<partition>XFSxfs_growfs -d /dev/<partition>
Diagnostics
To diagnose errors related to migration, examine the logs:
- vm-mover service — /opt/ispsystem/vm-mover/vm_mover_*.log files on the source server with the platform;
- installer — /opt/ispsystem/vm/install.log file on the source server with the platform and the master VM;
- vm-agent service — /var/log/vm-agent.log file on the cluster node with the master VM.