A physical network consists of many IP addresses and includes all the IP addresses from the first IP to the last one. A network has an address and a mask. E.g. 192.168.0.0/24, where 192.168.0.0 is the network IP address; /24 is the mask prefix. Such network includes all the IPs from 192.168.0.1 to192.168.0.254. Usually, one of the network IP addresses is a gateway for others. A gateway is an address that receives and sends data over the Internet.
In clusters with the IP fabric network configuration type, you can use the gateway address, the network address and the broadcast address to assign to devices.
Creating a physical network
To create a physical network:
- Go to Networks → Physical networks → Add a physical network.
-
To prevent the gateway address, network address, and broadcast address from being reserved, enable the Do not use service IP addresses option.
This option works only in clusters with the IP-fabric network configuration type. - Enter a Network in the following format <network IP address>/<network mask prefix>. E.g. "172.0.0.0/24".
-
Enter a Gateway.
If necessary, you can use an address from a different subnet as a gateway. Read more in How to add a physical network with a gateway from another subnet? - To add IP addresses of a network to the pool:
- Enable the Add the IP addresses to the pool option.
- In the Pool name field, select the name of an existing pool or enter the name of a new pool.
- Specify the IP addresses for new VMs. You can enter a single IP address ("1.1.1.1"), a mask ("1.1.1.1/24") or a range ("1.1.1.1-1.1.1.5").
- Select the clusters in which this pool will be used. If the cluster uses two network interfaces, specify whether the pool belongs to the Main or the Additional network.
- Click Add button.
Internal traffic accounting
You can specify clusters for which network traffic will be considered internal. Internal traffic is not counted in connected billing systems. The option is available only for clusters with the "IP-fabric" network configuration type.
To select clusters:
- Go to Networks → Physical networks → select the network → Network parameters.
- Select Clusters with excluded traffic.
- Click Save button.
Reserving IP addresses
You can reserve individual IP addresses in the network. VMmanager will not use these addresses when assigning IP addresses to VMs.
To reserve an IP address or subnet, enter Networks → select the network → Allocate IP address:
- Select whether to reserve an IP address or a Subnet.
- If you need to reserve an IP address, select the mode:
- Auto — specify the IP address count;
- Set manually — enter the IP addresses.
- If you need to reserve a subnet, specify the Subnet mask.
- Specify the Domain Name for which the address will be reserved.
- To prevent the IP address from being deleted, enable the Protect the IP address from accidental deletion option.
- Specify an arbitrary Comment.
- Click the Allocate IP address (Allocate subnet) button.
Managing IP addresses
To view all IP addresses used, enter Networks → IP addresses. You can filter the list of addresses on this tab by IP address, physical network or node status. In the Note column, you can add a comment to the IP address.
Free IP addresses
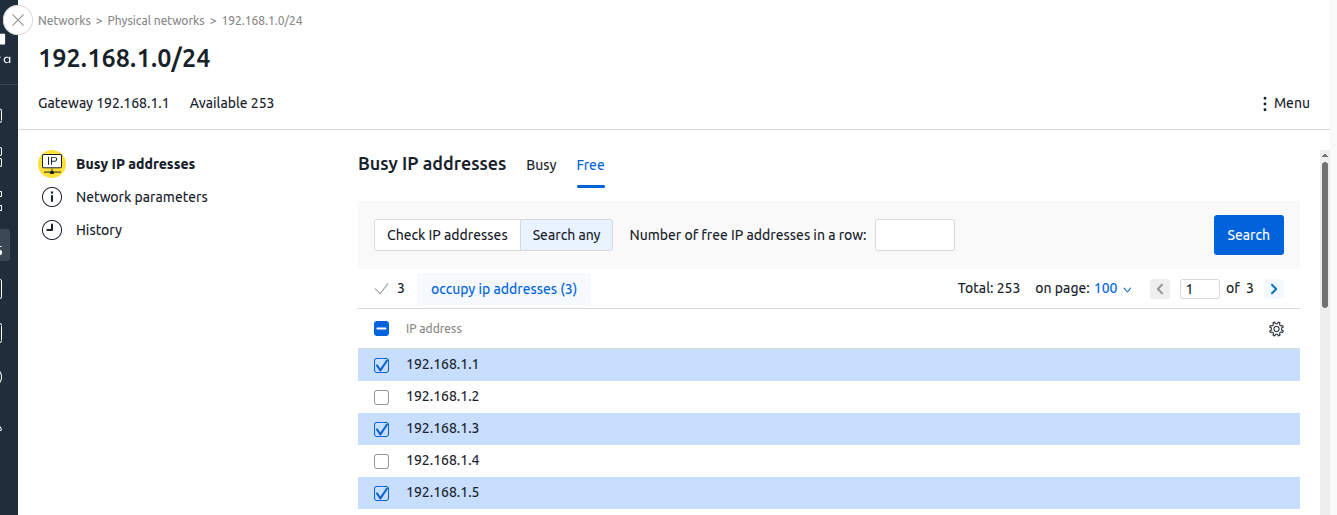
To view free addresses on an IPv4 network, go to Networks → select a network → IP addresses tab → Free tab.
To check if a specific address or range of addresses is free, click Check IP addresses → enter the IP address or range (e.g. 192.168.1.1.1-192.168.1.10) → Search button.
To find a free range of IP addresses, click Search any → enter the Number of free IP addresses in a row → Search button.
You can reserve free IP addresses:
- If you need to reserve one address, select the row with that address and click the Occupy IP address button. If you need to reserve multiple addresses, select the rows with the desired addresses and click the occupy ip addresses button in the table header.
- Specify the Domain name for which the address will be reserved.
- To ensure that the IP address cannot be deleted, enable the Protect the IP address from accidental deletion option.
- Enter an arbitrary Comment.
- Click the Allocate IP address button.

Tab interface
History of actions in the network
To view the history of actions, go to the Networks → click on the name of the network → History. The history page displays information about:
- adding and removing IP addresses;
- changing the domain name for the IP address.
 En
En
 Es
Es