Pools are used to logically combine blocks of IP addresses. Pooling IP address blocks allows you to:
- divide address blocks into public and private;
- use only the necessary blocks in clusters.
Creating a pool
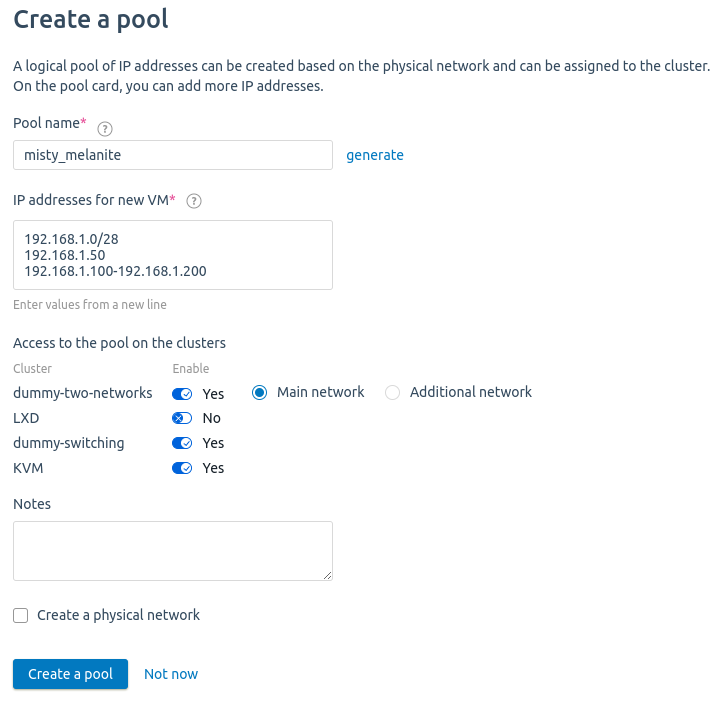
To create a pool of IP addresses:
- Enter Networks section → IP pools tab → click Create an IP pool button.
- Enter or generate a Pool name.
- Specify IP addresses for new VMs — address blocks included in the pool. You can specify a single address (10.1.1.1.1), addresses by mask prefix (10.1.1.0/24), or a range of addresses (10.1.1.1.1-10.1.1.1.5). Each block is entered on a separate line.
- In the Access to the pool on the clusters section, select the clusters in which the pool should be available. If two network interfaces are used in the cluster, specify whether the pool belongs to the Main or Additional network. Read more in Main and additional network.
- Specify Notes to the pool. They will be displayed in the pool table.
- If the specified address block is not part of any of the physical networks created in the platform:
- Enable the Create a physical network option.
- If the pool will be used in a cluster with an IP-fabric network configuration type, you can enable the Do not use service IP addresses option. Then all addresses including the gateway, network address and broadcast address will be available for the VMs.
- Specify the Network in the format <network address>/<network mask prefix>. For example, 172.16.1.0/24.
- Specify the Gateway address for the network.
- Specify a Note to the network. It will be displayed in the network table.
- Click Create a pool button.

Managing pools
To manage the pool, enter Networks section → IP pools tab → select a pool →  menu. Available actions:
- IP addresses and ranges — manage blocks and individual IP addresses within the pool;
- Add the IP addresses to the pool;
- Parameters — edit the pool name, cluster access settings, and notes;
- Note — edit the note;
- Delete pool.

Managing IP addresses and ranges
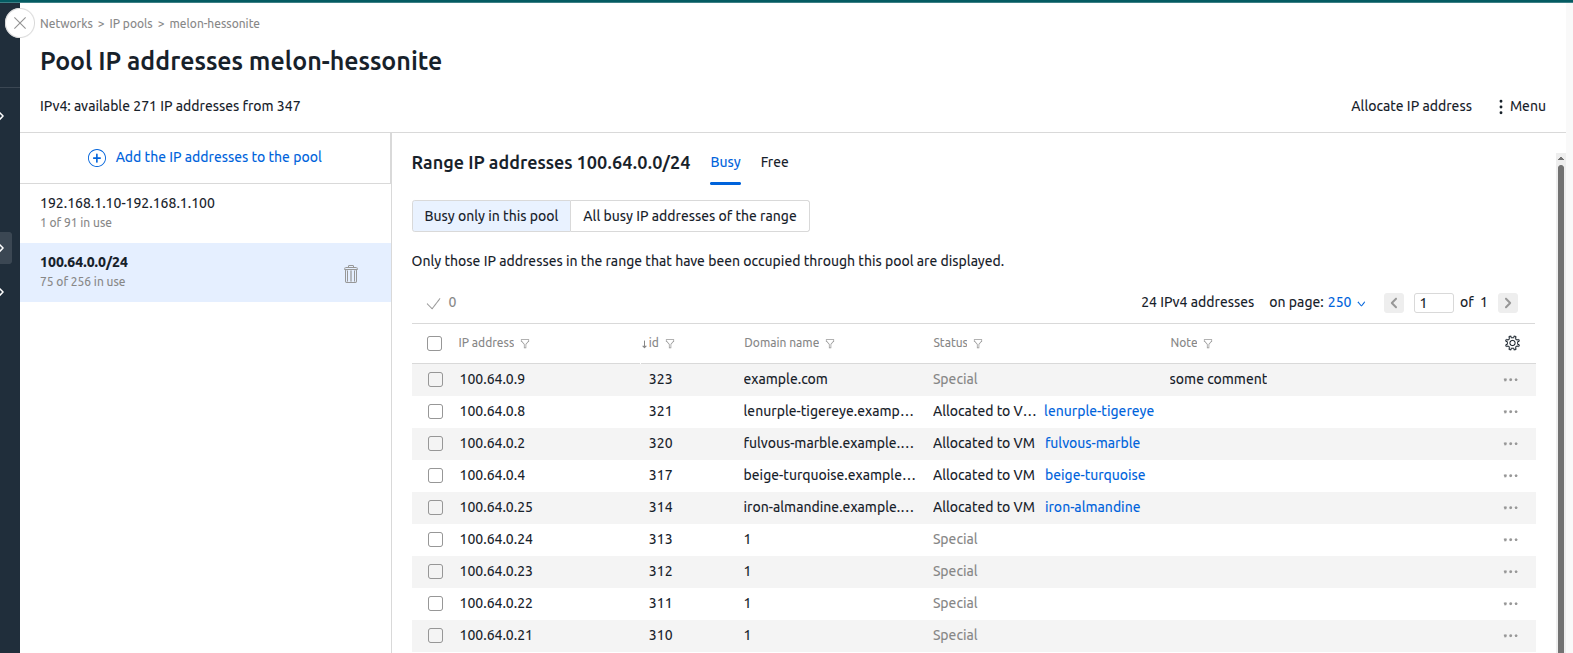
To manage the pool address space, enter Networks section → IP pools tab →  menu → IP addresses and ranges.

The left side of the window displays a list of ranges used in the pool. To add IP addresses to the pool:
- Click Add the IP addresses to the pool button.
-
Specify IP addresses for new VMs — address blocks included in the pool. You can specify a single address (10.1.1.1.1), addresses by mask prefix (10.1.1.0/24), or a range of addresses (10.1.1.1.1-10.1.1.1.5). Each block is entered on a separate line.
Blocks will not be added if they overlap with the pool address space. - If the specified address block is not part of any of the physical networks created in the platform:
- Enable the Create a physical network option.
- If the pool will be used in a cluster with an IP-fabric network configuration type, you can enable the Do not use service IP addresses option. Then all addresses including the gateway, network address and broadcast address will be available for the VM.
- Specify the Network in the format <network address>/<network mask prefix>. For example, 172.16.1.0/24.
- Specify the Gateway address for the network.
- Specify a Note to the network. It will be displayed in the network table.
- Click Add button.
For clusters with the Routing network configuration type, add IP addresses in the node card:
- Enter Nodes section→ click the node name → Parameters button→ IP addresses → select IPv4 or IPv6 → Add an IP address button.
- Specify the IP addresses for new VMs.
- Click Add button.
To delete an IP address range, click the ![]() icon next to the selected range.
icon next to the selected range.
Free IP addresses
To view free addresses on an IPv4 network, go to Networks → select a network → IP addresses tab → Free tab.
To check if a specific address or range of addresses is free, click Check IP addresses → enter the IP address or range (e.g. 192.168.1.1.1-192.168.1.10) → Search button.
To find a free range of IP addresses, click Search any → enter the Number of free IP addresses in a row → Search button.
Reserving IP addresses
You can reserve individual IP addresses or subnets in the pool. VMmanager will not use them when assigning IP addresses to VMs.
To reserve an IP address or subnet:
- Enter Networks section → IP pools tab →
 menu → IP addresses and ranges.
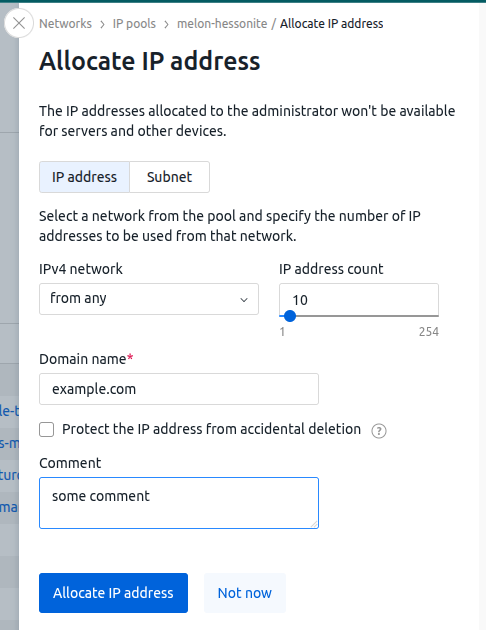
 - Click Allocate IP address button.
- If the pool has both IPv4 and IPv6 addresses, select the address type.
- Select which to reserve: IP address or subnet.
- Select the IPv4 network (IPv6 network) from which the IP address will be allocated. You can choose to allocate an IP address from any network. In this case, the IP address will be selected randomly.
- If you want to select a subnet, select Subnet mask.
- Specify the Domain name.
- To prevent an IP address or subnet from being deleted, enable the Protect the IP address from accidental deletion option.
- Specify the Comment.
- Click Allocate IP address (Allocate subnet) button.

After reservation, the IP address or subnet assumes the status "Special".
To cancel reservation of an IP address or subnet:
- Enter Networks section→ IP pools tab →
 menu → IP addresses and ranges.
 - On the left side of the window, select the range from which the IP address or subnet was reserved.
- If deletion protection was enabled during reservation, select the reserved IP address or subnet on the right side of the window →
 menu → Settings → disable the Protect the IP address from accidental deletion option → Apply button.
 - On the right side of the window, select the reserved IP address or subnet →
 menu → Deallocate → Deallocate IP address button.
 En
En
 Es
Es