You can configure notifications to users about the status of virtual machines (VMs) and cluster nodes. Grafana allows you to send notifications by email and/or to various messengers (e.g. Slack or Telegram).
This article contains instructions on how to configure notifications for the VMmanager platform. In the current version, the platform uses Grafana v6.7.4.
For instructions for the latest version of Grafana, see the official documentation.
Notification channels
Telegram
To configure the notifications channel in Telegram:
- Create a Telegram bot according to the instructions in the Sending notifications to Telegram article. Save the token value for the bot.
- Enter Alerting → Notification channels.
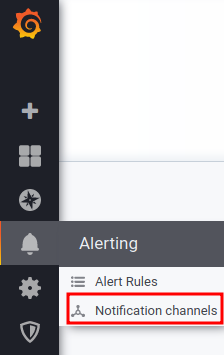
- Press Add channel (New Channel).
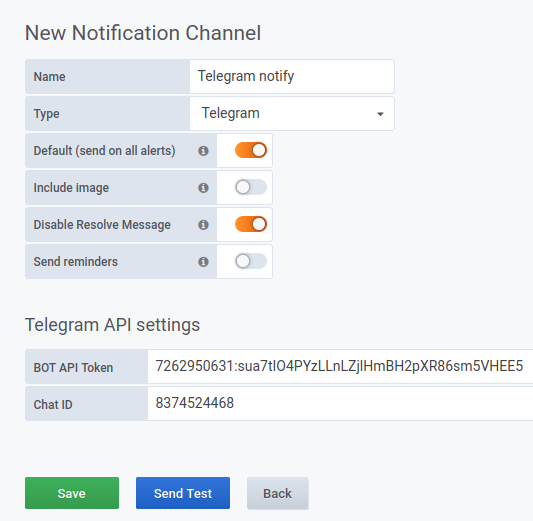
- Specify the notification Name. For example, Telegram notify.
- In the Type field, select the notification type — Telegram.
- Enable the option Default (send on all alerts) to use this method for all notifications.
-
Enable the option Include image to add the dashboard image to the notification.
We do not recommend using this option, as creating an image places high load on the Grafana docker container. - Enable the option Disable Resolve Message so as not to receive a resolve message for an issue regarding which notifications have been sent.
-
Enable the option Send Reminders to receive reminders of the notification created and specify the frequency of sending in the Send reminder every parameter. For example, 15m — for sending the reminder every 15 minutes.
Reminders cannot be sent more frequently than the notifications themselves. - Specify the Telegram settings:
- BOT API Token — Telegram bot token.
-
Chat ID — Telegram chat id.
To get the chat id, add the bot @getmyid_bot to the chat.
- Press Send Test to send a test message.
- Press Save to save the changes.
Slack
To configure the notifications channel in Slack:
- Enter Alerting → Notification channels.

- Press Add channel (New Channel).
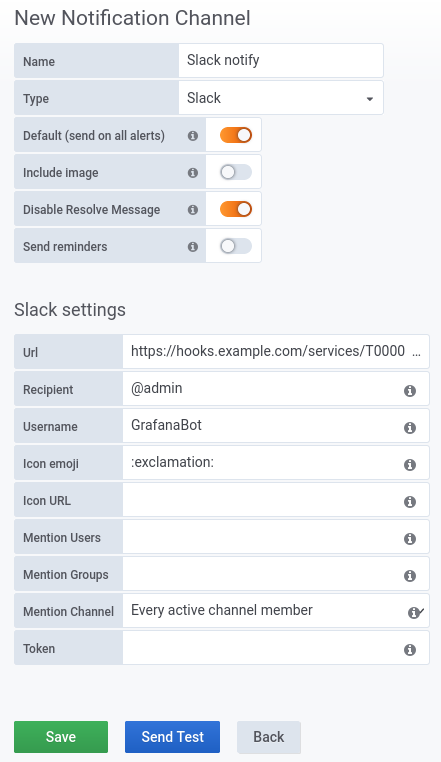
- Specify the notification Name. For example, Slack notify.
- In the Type field, select the notification type — Slack.
- Enable the option Default (send on all alerts) to use this method for all notifications.
-
Enable the option Include image to add the dashboard image to the notification.
We do not recommend using this option, as creating an image places high load on the Grafana docker container. - Enable the option Disable Resolve Message so as not to receive a resolve message for an issue regarding which notifications have been sent.
-
Enable the option Send Reminders to receive reminders of the notification created and specify the frequency of sending in the Send reminder every parameter. For example, 15m — for sending the reminder every 15 minutes.
Reminders cannot be sent more frequently than the notifications themselves. - Specify the Slack settings:
- Url — URL address of incoming Slack webhooks. Read more in the official Slack documentation.
- Recipient — message recipient. Enter the channel name in the format #channel_name or user name in the format @username.
- Username — notification sender user name.
- Icon emoji — emoji for the notification sender icon. For example, :exclamation:.
- Icon URL — URL with the notification sender icon image.
- Mention Users — ids of the Slack users to be mentioned in the message. You can list the names separated by commas.
- Mention Groups — Slack groups to be mentioned in the message.
- Mention Channel — to which members of the channel to send a notification:
- Disabled — don't send;
- Every active channel member;
- Every channel member.
- Token — bot token for using Slack file.upload API function. To use this feature, specify the recipient of the message in the Recepient field.
- Press Send Test to send a test message.
- Press Save to save the changes.
Example of settings
Notification parameters
To configure the notification sending rules:
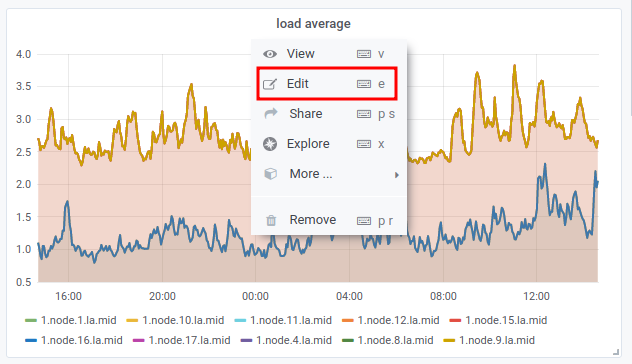
- Press the graph header → Edit.
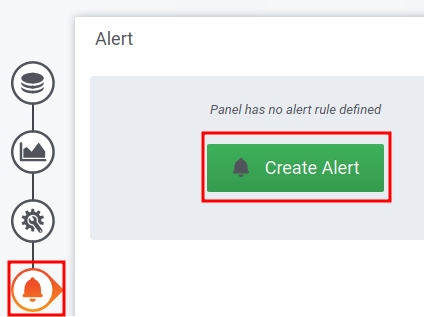
- Press
 → Create alert.
- Specify the notification parameters:
- Name — discretionary notification name.
- Evaluate every — notification interval. For example, 5m for notification every five minutes or 1h for notification every hour.
- For — the time that Grafana waits after the threshold value of the parameter has been reached. For example, 15m for 15 minutes waiting time.
-
Conditions — conditions for notification:
Condition formatWHEN function OF query(id, start_time, end_time) condition valueComments to the formatExample of conditionWHEN avg() OF query(A, 15m, now) IS ABOVE 90Comments to the exampleTo set an additional condition, press
 . To add a condition through the logical "AND" specify the operand AND at the beginning of the condition. To add a condition through the logical "OR" specify the operand OR at the beginning of the condition. Additional conditions are checked sequentially in the order they are entered.Example of condition
WHEN avg() OF query(A, 15m, now) IS ABOVE 90
AND max() OF query(A, 15m, now) IS ABOVE 95
Comments to the exampleRead more about the condition format in the official Grafana documentation. - If no data or all values are null — notification status if data are missing or have the null value. Possible values: Alerting, No Data, Keep Last State, OK;
- If execution error or timeout — сnotification status in case of an error during its execution. Possible values: Alerting, Keep Last State.
- Select the notification channels in the Send to field.
- Enter the notification text in the Message field.
- Save the settings: on the upper right menu, click the
 icon → enter the settings comment → Save button.
 En
En
 Es
Es
 (Queries) section;