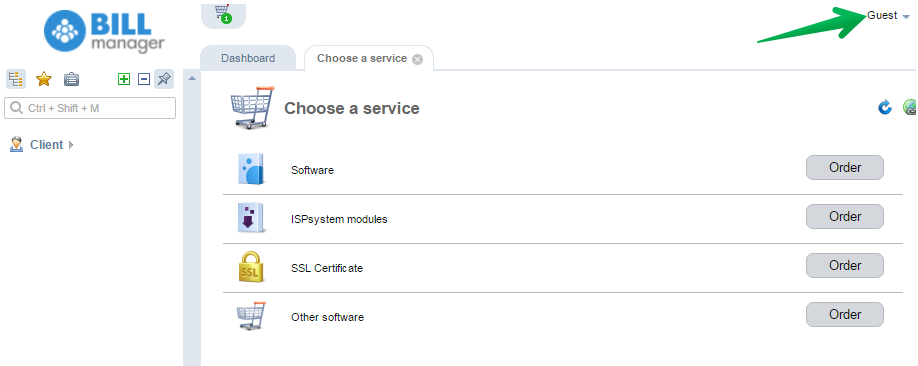
A shop-window shows how your services created in BILLmanager will be displayed on your website.
The shop-window allows working with unauthorized users.
Earlier, a client could see products and services available for order only at the provider's website or after login in BILLmanager (the provider had to keep the tariff plans and prices always up-to-date), but now the shop-window enables potential clients to view and order services without preliminary registration and authorization.
Furthermore, BILLmanager includes a standard website template which helps new hosting providers who don't have their own website to get their own automatically generated website from the scratch. This template includes standard modules and functions (modules - About company, Services, etc.; functions - registration, login to Client area, etc.). Information on your website, including your company's information, will be generated based on tariff plans created in BILLmanager; the company information will be also automatically uploaded from the billing system. In this case, your website will always contain up-to-date information about your company and services.
Providers who already have a website can integrate it with the shop-window. This will also allow updating information about services and prices automatically.
Configuration
Navigate to Provider → Global settings → Shop-window settings.
- Disable shop-window — the shop-window is hidden.
- Login form — the shop-window is activated. You can set up integration with your website or provide a direct link to the shop-window.
- Open panel — when a client follows the BILLmanager URL in the browser, the Shop-window will be opened instead of the login form.
- Shop window site — when a client follows the BILLmanager URL in the browser, the automatically generated website will be opened.
In Provider → Global settings → the Main tab, you can activate the option Delete guest customer profiles. Enable the option to allow BILLmanager to delete guest accounts if they remain idle for more than the specified number of days.
Shop-window
The shop-window allows an unauthorized user to view services offered by the service provider:

With the shop-window, you can not only view the services but also order them. After the client has chosen the service and placed a new order into the Cart, BILLmanager will ask to register and pay for the order:

Website
If you select the Shop-window site configuration, the automatically generated website will be opened when a client uses the BILLmanager URL in the browser. The website is automatically created and updated accordingly as you edit Company, Provider, Tariff plan, Brand settings. Custom templates will be deleted.
Source data for the website is located in the '/usr/local/mgr5/etc/showroom' directory. You can modify it according to your needs.
The generated site is located in the '/usr/local/mgr5/skins/showroom/1/' directory, where 1 is provider Id. The website can be accessed via BILLmanager URL.
Specify the correct Site URL and Billing URL in the Provider configuration form.
The showroom function generates the website. This function updates websites for all providers you have. You can call the function manually with the following command:
/usr/local/mgr5/sbin/mgrctl -m billmgr showroomTo reset the changes in the directory with the website templates, delete the /usr/local/mgr5/etc/showroom directory. The website will be created using the default templates located in /usr/local/mgr5/etc/showroom.sample.
Integration with the existing website
To add a shop-window, place the following script on the page where you want your shop-window to be displayed:
<script src="BILLMGR_HOST/manimg/orion/billmgrStore.init.js"></script>

<script type="text/javascript">
  billmgrStore.init({
    host: BILLMGR_HOST,
    startform: STARTFORM
  });
</script>
<noscript>You should turn on JavaScript!</noscript>
BILLMGR_HOST - the billing system hostname. It can be your server URL, for example, "https://my.ispsystem.com"
STARTFORM - parameters of the Shop-window form. It can be a string with form parameters, for example: func=showroom.redirect&redirect_to=service.order.itemtype. It cannot have the value "func=register.logon", i.e you don't need to specify the registration function.Allow_origin configuration
To configure allow_origin, add the following information into the ihttpd configuration file usr/local/mgr5/etc/ihttpd.conf:
allow_origin <site's domain name>For example:
listen {
	ip 172.32.12.23
	allow_origin http://showroom.com
	redirect
}
where "http://showroom.com" is your website with the shop-window.
Parameter configuration
Example
<!DOCTYPE html>
<html>
  <head>
    <title>My Store</title>
    <meta name="viewport" content="width=device-width, initial-scale=1.0">
  </head>
  <body>
    <ul>
      <li id="basket"></li>
      <li id="usermenu"></li>
    </ul>
    <h1>Welcome to my store!</h1>
    <div>
      <script src="https://my.ispsystem.com/manimg/orion/billmgrStore.init.js"></script>
      <script type="text/javascript">
        billmgrStore.init({
          host: 'https://my.ispsystem.com',
          startform: 'func=showroom.redirect&redirect_to=service.order.itemtype',
          basket: { blockId: 'basket' },
          usermenu: { blockId:  'usermenu' },
          title: true,
          wizard_step: true,
          custom_css: 'https://my.ispsystem.com/manimg/orion/default/custom.css'
        });
      </script>
      <noscript>Enable JavaScript!</noscript>
    </div>
  </body>
</html> En
En
 Es
Es