To use the Tinkoff payment module, you need to register in the payment system and configure the module in BILLmanager.
Configuration on BILLmanager side
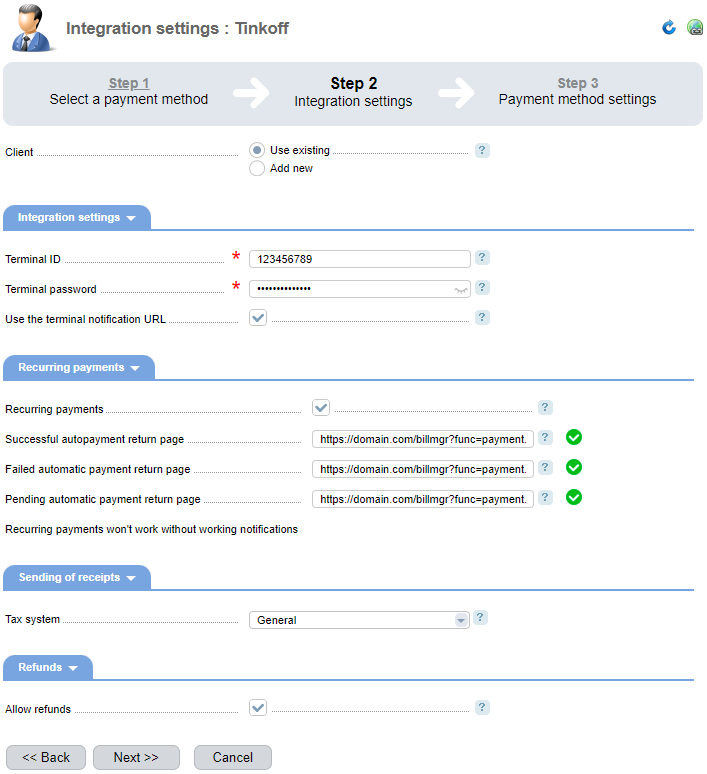
To connect the payment module, enter Provider → Payment methods. The connection wizard consists of three steps:
- Step 1. Selection of payment method. Select "Tinkoff" as the payment method.
- Step 2. Configuring the integration. Enter the information for integration with the payment system.
- Step 3. Configuring the payment method. Specify internal (within BILLmanager) parameters of the payment method.
Configuring the integration
The Client in the payment system parameter offers to use an existing account on the side of the payment system or create a new one. If using an existing account, specify the details for integration:
- Terminal ID — terminal ID for connecting to the Tinkoff API. These details are provided when you register in the payment system;
- Terminal password — terminal password for connecting to the Tinkoff API. These details are provided when you register in the payment system;
- Use notification address from the terminal's client area — determines where the link will be sent to clients when they make payments:
- option enabled — from the terminal's client area;
- option disabled — from BILLmanager.
-
Recurring payments - the option includes use of recurring payments and creation of saved payment methods. Recurring payments in BILLmanager are used for automatic personal account topup. If you set up auto-payment on the client side, the payment of 1 ruble will be made automatically. This is necessary to confirm that the bank card is active. When the recurring payment activation procedure is completed, this payment will be canceled.
If the flag is active, specify:- Return page after a successful auto-payment - the page to which the payer will be redirected if the auto-payment is successful. Use the BILLmanager page https://domain.com/billmgr?func=payment.recurring.success or a discretionary page;
- Return page after an unsuccessful auto-payment - the page to which the payer will be redirected if the auto-payment fails. Use the BILLmanager page https://domain.com/billmgr?func=payment.recurring.fail or a discretionary page;
-
Return page after an auto-payment in progress - the page to which the payer will be redirected if the auto-payment is in progress. Use the BILLmanager page https://domain.com/billmgr?func=payment.pending or a discretionary page.
CommentsNote.The creation of recurring payments is only confirmed by notifications. If BILLmanager has not received a notification from Tinkoff, no new auto-payment or a saved payment method will be created.
Auto-payments and saved payment methods already created will work even without notifications.
- Taxation system - allows you to choose the system of taxation used to be specified when a receipt is generated;
- Allow payment refund - if this option is enabled, payment refunds are allowed.
When the Create new parameter is selected, a link to the registration in Tinkoff system is shown.

Additional information
Payment refund
To allow payment returns, enter Provider → Payment methods → Edit button → Allow payment refund option. Refunds are supported for payments with the “Credited” status.
Logging
Logs of interaction between the billing system and Tinkoff are written to the following files:
- /usr/local/mgr5/var/pmtinkoff.log — log file of payment module settings, recurring payments and refunds, scheduled check of payment statuses;
- /usr/local/mgr5/var/tinkoffpayment.log — payments log file;
- /usr/local/mgr5/var/tinkoffnotification.log — notifications log file;
- /usr/local/mgr5/var/tinkoffrecurring.log — recurring payment settings log file.
 En
En
 Es
Es

