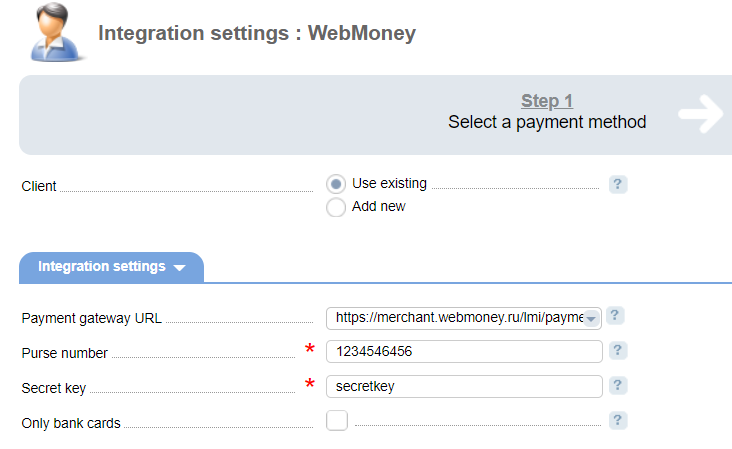
To add Webmoney, you need to configure the settings on the payment gateway side and add the module in BILLmanager.
Configuring the payment method
Complete the following steps:
- Make sure the Send parameters in preliminary request option is disabled .
- Enabled the function Use URL passed in the form.
- In the Result URL field enter "https://<URL_BILLmanager>/mancgi/wmresult".
- In the Success URL field enter "https://<URL_BILLmanager>/billmgr?func=payment.success".
- In the Fail URL field enter "https://<URL_BILLmanager>/billmgr?func=payment.fail".
- Signature algorithm — "SHA256".
- Data sent method — "POST".
Configuring BILLmanager
Navigate to Provider → Payment method and complete the following fields:
- Step 1 — Select a payment method — choose "Webmoney".
- Step 2 — Integration settings. Enter the integration details.
- Step 3 — Payment method settings. Enter the payment method parameters.
Integration

Client — select the existing account or register a new one. If you choose "Use existing", enter the following details:
Payment gateway URL — enter the gateway URL for payments.
Purse number — enter the WebMoney purse number.
Secret key — enter the secret key from your WebMoney account. It can match the key specified on the payment gateway side.
Only bank cards — select the check box to receive payments only from clients' bank cards.
Selecting Add new will redirect you to the Webmoney registration form.
Additional information
Refund
Refunds are not supported.
Logging
Webmoney has the following log files:
- '/usr/local/mgr5/var/ pmwebmoney.log' — configuration details of the payment method.
- '/usr/local/mgr5/var/ wmpayment.log' — payment log.
- '/usr/local/mgr5/var/ wmresult.log' — responses from the payment gateway.
 En
En
 Es
Es

