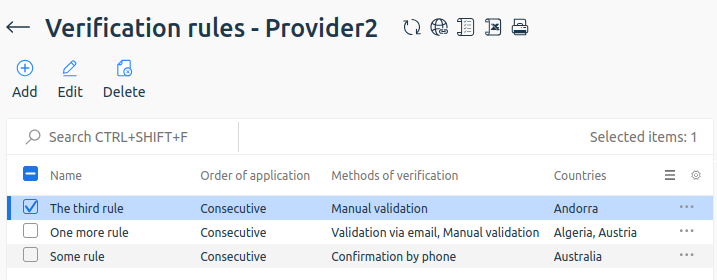
Client verification on the provider's side is the process when a service provider checks and confirms the client's identity and data. BILLmanager allows:
- to set different client verification settings by provider;
- to set different client verification settings depending on the client's country;
- to mark a client as verified immediately after registration, if he/she has logged in to BILLmanager using a phone number;
- mark a customer as verified if they have made a payment via a verified payment method.
Under Provider → Providers → select provider → Client Verification you can:
- Add verification rules for clients;
- Edit existing verification rules;
- Delete verification rules;

Methods of verification
There are the following verification methods:
- by phone;
- by email;
- manual;
- on the I.D. log.
When confirming by phone, the client is sent an SMS with a code, which the client enters for verification. You can limit the number of attempts to receive and enter the code.
When confirming by email, an email will be sent to the client's address. The email will include a link that you need to follow to confirm the email address specified during registration. You can specify the period until the email is sent again.
With manual confirmation, the customer will have to wait for a representative of the responsible department to verify the account.
When confirming by log, the client must perform an action for a record of this action to appear in the log. For example, make a payment via a verified payment method, authorize via Google account or by phone number.
Group of providers
If the client uses the personal account of a provider in the group, but is not affiliated with this provider, verification is not required. The client can use services of other providers from the same group without additional verification. For more details, see the article Provider groups.
Creating a verification rule
To create a verification rule:
- In the left menu, open Provider → Providers.
- Select the provider.
- Click the Client verification button.
- Click Add.
- Fill in the Basic settings:
- Name.
- Client country — select one or more variants. If the country was previously selected for another provider's verification rule, it cannot be selected again. If no provider rule is set up for a country, clients from these countries should not be verified.
- Order of application — select the order in which data validation will be requested for client verification.
- Consecutive — the client must be verified by all methods that are specified.
- Parallel — it is sufficient for the client to be verified by one of the selected methods. All other methods will be performed automatically.
- Consecutive — the client must be verified by all methods that are specified.
- Verification sequence — select the order in which data verification will be requested for customer verification:
- Phone number, email, manual;
- Email, phone number, manual.
- Include previously registered customers — if this option is enabled, verification under the terms of the rule will affect customers who have not previously been verified.
- Choose and configure Methods of verification:
- Confirmation by phone:
- Choose when to ask the customer for confirmation by phone number:
- Before paying for the order — to pay for the ordered service you need to specify and confirm your phone number;
- After payment for the order — to activate paid service you need to specify and confirm your phone number;
- After registration — to get access to personal account you need to specify and confirm your phone number.
- Enter Number of attempts to receive a code — specify the number of attempts to send the code for verification.
- Enter Number of attempts to enter code — specify the number of attempts to enter the code for verification. Read more about the use of this setting in Fraud protection.
- Choose when to ask the customer for confirmation by phone number:
- Confirmation by email:
- Choose when to ask the customer for confirmation by email:
- Before paying for the order — to pay for the ordered service you need to specify and confirm email, listed on the registration;
- After payment for the order — to activate paid service you need to specify and confirm email, listed on the registration;
- After registration — to get access to personal account you need to specify and confirm email, listed on the registration.
- Enter Sending period, seconds — specify time after which the verification email can be sent again. By default, this value is set to 300. Read more in Notification types.
- Choose when to ask the customer for confirmation by email:
- Manual confirmation of an account:
- Choose when to ask the customer for confirmation.
- Before paying for the order — to pay for the ordered service, you need to wait until the procedure of manual verification of the account is completed;
- After payment for the order — to activate paid service you need to wait until the procedure of manual verification of the account is completed;
- After registration — to get access to personal account you need to wait until the procedure of manual verification of the account is completed.
- Select a Department that will receive tasks for manual confirmation of client accounts.
- Choose when to ask the customer for confirmation.
- Identification log confirmation. Verification method Identification log confirmation is available for selection only if Identification logging is enabled. To enable Identification logging, go to Clients → Identification log → Settings → Enable Logging. For more information, see the Identification log article.
- Confirmation by phone:
- Press Ок.
Changing verification rule
To change the verification rules, go to Provider → Providers → select provider → Client Verification → Edit → specify new settings. To set up the settings, see Creating a verification rule section.
Viewing client verification status
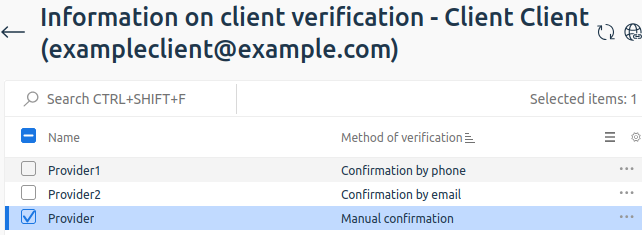
To see if the client is verified and to find out by which verification method, go to Clients → Clients → select the required client → Verification. Information about which verification methods the client has passed will be reflected in the table.
For example, if a client has been verified consecutively and the provider has selected Phone confirmation, Email confirmation and Manual confirmation as the verification methods, the status will look as follows:

Deleting verification rule
To delete verification rule:
- In the left menu, open Provider → Providers.
- Select the provider.
- Click the Client verification button.
- Select the rules you want to delete.
- Press Delete button.
- Press Ок.
Related articles
 En
En
 Es
Es