To use the Adyen payment module, register in the payment system and configure the module on the BILLmanager side.
Configuring BILLmanager
To create a payment module, enter Provider → Payment methods → click Add. The payment module adding wizard consists of the following steps:
- Select a payment methods: "Adyen".
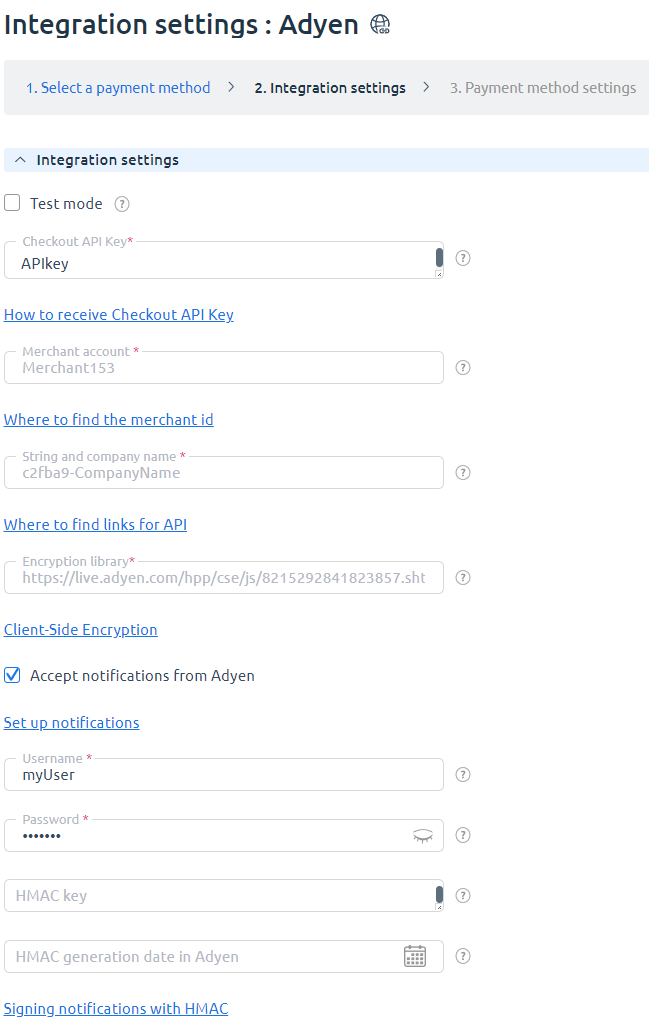
- Integration settings. Specify the data for integration:
- Test mode — select the checkbox to activate a test mode for this payment method. The system won't charge the client but will process the payments correctly;
- Checkout API Key — a unique key to connect to Adyen API. To find the key, go to Settings → Users and select a required user. For more information about the API Key please refer to the article How to get the Checkout API Key in the Adyen documentation;
- Merchant account — the name of the Adyen merchant account. For more information please refer to the article Manage your account structure
- String and company name — a unique name of your company that is used for requests to Adyen. Learn more under Live endpoints;
- Encryption library — a unique URL for you to retrieve the Client-Side Encryption library hosted by Adyen. To generate a library name, go to Settings → Users → ws@company.<your company name> → Easy encryption. Learn more under Client-Side Encryption;
- Receive notifications from Adyen — this checkbox allows you to set up synchronization of payment statuses. Learn more in the section Synchronization of payment statuses. If the option is enabled, enter the additional information:
- Username — your username with Adyen in Authentication → User Name;
- Password — your password with Adyen in Authentication → Password;
- HMAC key — a unique combination for encryption that you can receive from Adyen in Addition Settings.
- Recurring payments — select the checkbox to enable recurring payments;
- Refunds — select the check box to allows refunds.
- Payment method settings. Configure internal (within BILLmanager) parameters of the service payment module. For more details, see How to add a payment gateway module.

Synchronization of payment statuses
Complete the following steps to set up the automatic synchronization of payment statuses between Adyen and BILLmanager:
- Log in to your Adyen client area.
- Go to Account → Server communication → Transport.
-
In the URL field enter the URL to receive notifications from the payment system: "billmgrURL/mancgi/adyennotify".
Details - Select SSL Version.
- Enable Accept expired, Accept self-signed and Accept untrusted Root Certificates for correct synchronization.
-
Enter the User Name and Password in Authentication.
Note:You will need them to configure the payment system in BILLmanager. -
To encrypt the notifications, in Addition Settings click on Generate new HMAC key.
Note:Use this key to configure the payment method in BILLmanager. - In BILLmanager go to Provider → Payment methods → Edit or in the payment method configuration form enable the option Receive notifications from Adyen
Additional information
Refund
To enable refunds, navigate to Provider → Payment methods → Edit → check the Allow refund box. The refund can be made only for "Paid" payments.
Logging
Adyen has the following log files:
- /usr/local/mgr5/var/pmadyen.log — configuration details of the payment method and refunds;
- /usr/local/mgr5/var/adyenpayment.log — payment log;
- /usr/local/mgr5/var/adyenresult.log — responses from the payment gateway. The file is not present if no responses were received from the payment gateway;
- /usr/local/mgr5/var/adyenrecurring.log — recurring payments log. The file is not present if recurring payments are not enabled;
- /usr/local/mgr5/var/adyenrecresult.log — responses from the payment gateway when recurring payments are activated. The file is not present if recurring payments are not enabled;
- /usr/local/mgr5/var/adyennotify.log — Adyen payment status notification log. The file is not present if no notifications were sent from the payment gateway.
 En
En
 Es
Es