When DCImanager processing module is installed, the billing platform would require integration with IPmanager. This integration is needed to manage IP addresses.
When opening a new Dedicated server, BILLmanager manages the selection of IP addresses: It requests an available IP from IPmanager, chooses the appropriate server in DCImanager and assigns the IP address to it.
IPmanager can be installed on the server with BILLmanager or on another server. After installation, you can integrate it with BILLmanager.
IPmanager settings
After integration, you need to create and set up a user account and the network of IP addresses in IPmanager.
In IPmanager in Main → Networks you can add networks which IP addresses will be provisioned for dedicated servers.
We recommend creating a new account in Main → Users with the User access level, as opposed to using the existing account. This account will be utilized later for integration.
Each user has specific rights on IP addresses. It can be certain IPs, address ranges or subnets. In order to set up access rights, please go to section Users and click on Rights.
For example, a service provider has network 185.60.134.110/24. Only the range 133.31.223.110-133.31.223.126 is to be used for dedicated servers. In this scenario, network 185.60.134.110/24 is created in IPmanager. However, the user will have rights only for the range 133.31.223.110-133.31.223.126.

You need to change the value public in the list Allowed groups of IP addresses. Only IPs from this group will be used by the billing platform for Dedicated servers.
BILLmanager settings
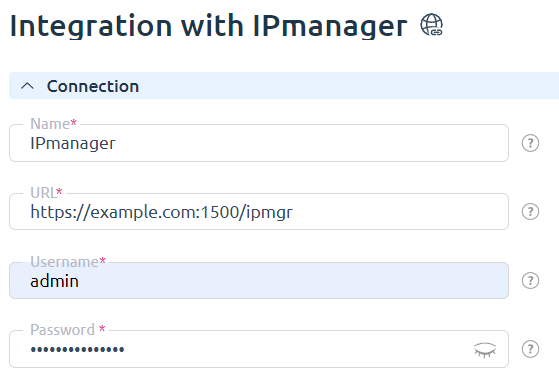
Integration with IPmanager can be performed in BILLmanager in Integration → IPmanager. Integration form consists of two sections: Connection and Synchronization of the list of IP addresses.
Connection
- Name —any name for the integration.
- URL — IPmanager address. It is important here to have access to this address from BILLmanager server.
- User name — IPmanager account with the User access rights. This user will be used by BILLmanager to apply to IPmanager and get or return IP addresses.
- Password — user password.

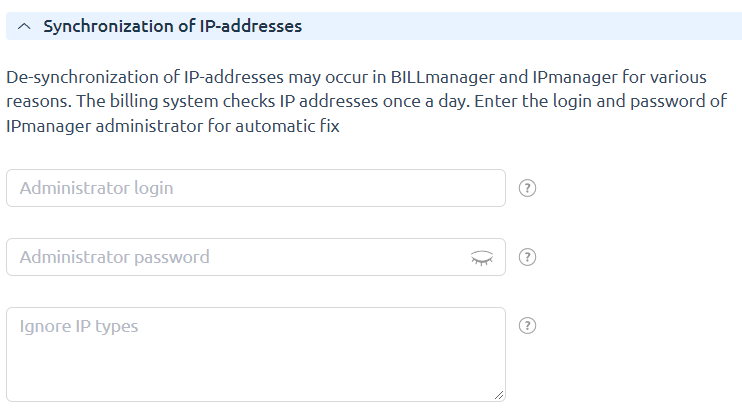
Synchronization of the list of IP addresses
During synchronization, IP addresses in IPmanager are compared with those in BILLmanager.
- If an IP is occupied in IPmanager but is missing in the billing platform, BILLmanager will send the request to IPmanager to release this IP.
- If an IP is available in IPmanager but is attached to any service in the billing platform, then the billing platform will make this address occupied in IPmanager.

Synchronization is performed under the user which was used for integration. It means that BILLmanager will be able to release or occupy only those IP addresses that belong to this user. Sometimes it leads to the lack of access rights to edit the status of an IP address. You can specify login and password of IPmanager administrator at the synchronization settings tab to enable changes without access right limits.
If you want some types of IP addresses to never be released or occupied during synchronization, you can add them to the field Ignore IP types. Types of IP addresses are groups of IPs created in IPmanager → IP groups. For dedicated servers, BILLmanager uses the public IPs.
We do not recommend using the admin credentials from IPmanager for IP address synchronization, especially if in IPmanager there are IPs that have been occupied manually i.e. not by BILLmanager and these IPs are not attached to any service in the billing platform.
Otherwise, these IPs will be released by BILLmanager automatically.
Cron job fix.moduleip is responsible for IP address synchronization. Per default, it starts every day at 03:15 AM.
Integration with IPmanager 6
VMmanager 6 and DCImanager 6 platforms have a built-in module for address space management — IPmanager 6. To configure integration with this module:
- To allow VMmanager 5 to access only a certain pool of IP addresses, create a pool in VMmanager 6 (DCImanager 6) with the suffix public. For example, DCI5_public.
-
Create an administrator account named ipmgr5@example.com in VMmanager 6 (DCImanager 6).
ipmgr5@example.com is not an example, but the exact name that you need to specify when creating an account. - In DCImanager 5 and BILLmanager:
- Enter Integration → IPmanager .
- Specify the settings for integration:
-
URL — https://domain.com/api/ipmgr5/v3/ipmgr
Comments to the URL -
Username:
-
to allow the control panel to access only a certain pool of IP addresses, specify pool_XXX;
Comments - to allow the control panel to access the entire address space, specify an arbitrary user name.
-
- Password — password of the ipmgr5@example.com user.
- In the Synchronization of IP-addresses section leave the Administrator login and Administrator password fields blank.
-
- Press Ok button.
 En
En
 Es
Es