To use the PayMaster payment module, register in the payment system and configure the module on the BILLmanager side.
Module specifics
- Test operation mode is supported.
Configuration details on the payment gateway side
Login to the payment gateway and enter the following configuration details:
- Signature type — must match the type selected in BILLmanager.
- Secret key — secret word inside your PayMaster account.
- Payment notification — POST. URL address similar to
https:///mancgi/pmasresult - Success redirect —
https:///billmgr?func=payment.success - Failure redirect —
https:///billmgr?func=payment.fail - Allow URL change — select the check box.
- User should return back to web-site — option must be disabled. Otherwise, if the client refuses redirection to the merchant's site, payment information won't be sent to BILLmanager.
- Resend Payment Notification in case of failure — select the check box.
If you intend to use recurrent payments, you need to set up Direct signature.
BILLmanager configuration details
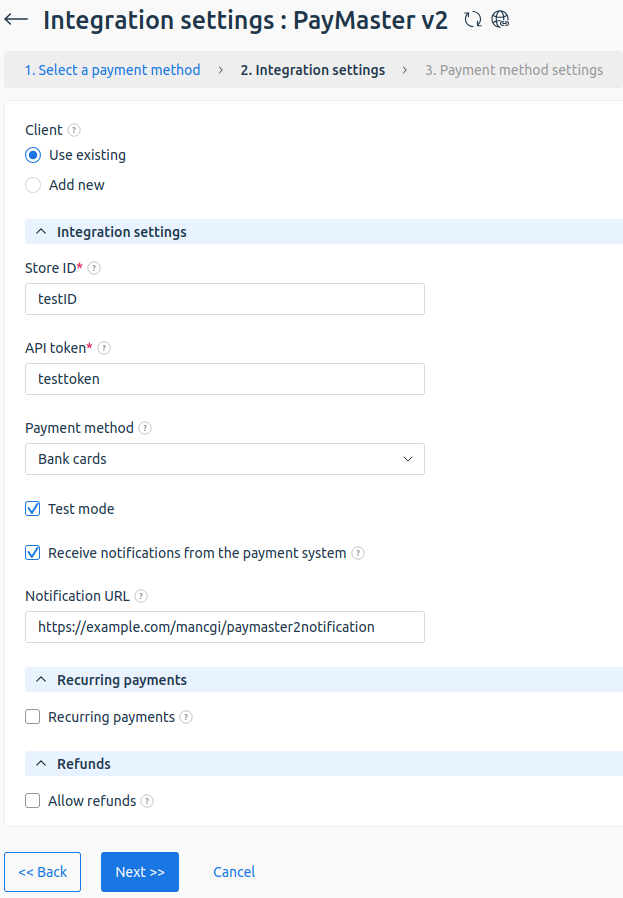
To create a payment module, enter Provider → Payment methods → click Add. The payment module adding wizard consists of the following steps:
- Select a payment methods: "PayMaster".
- Integration settings.
- If you do not have a Paymaster account, activate the Add new client option. Follow the link and create a new client.
- Complete the form for integration:
- Store id — ID of the account under which the company is registered in PayMaster system.
- API token — a secret key for authenticating requests.
- Payment method — specify the permitted payment method. By default, the Bank cards method is chosen.
- Test mode — select the check box to test the functionality of the payment module. Paymaster will not charge your card for test payments.
- Receive notifications from the payment system — to activate this option, check the box and specify the URL to which notifications will be sent in the Notification URL field.
- Recurring payments — enable the use of recurrent payments. In BILLmanager recurring payments are used for account automatic replenishment and for creating subscriptions.
- Pending automatic payment return page — page that will be opened after the autopayment status changes to “being processed”.
- Allow refunds — select the check box to allow full or partial refund of payments made with Paymaster.
- Payment method settings. Configure internal (within BILLmanager) parameters of the service payment module. For more details, see Integration with payment gateways.
Payment return
Configuration on the payment system side
Log into your PayMaster account. In Users create a new user with login method "Automatic access". Users must be assigned the Operationist role (viewing payment status and list of payments) or Accountant role (Operationist + payment return + list of returns + hold confirmation or cancellation).
Configuration on BILLmanager side
In the payment method settings enable Allow payments return option. Specify the data of the previously created user as login and password.
Technical information
PayMaster payment module records its activity in logs:
- /usr/local/mgr5/var/pmpaymasterv2.log — log file of payment module configuration and automatic payments;
- /usr/local/mgr5/var/paymasterv2payment.log — payment log file;
- /usr/local/mgr5/var/paymasterv2recurring.log— log file for activation of saved payment methods and automatic payments;
- /usr/local/mgr5/var/paymasterv2notification.log — log file for checking the status of payments, saved payment methods and automatic payments when receiving notifications from PayMaster.
 En
En
 Es
Es
