 En
En
 Es
Es
To use the PayPal Expanded Checkout payment module, configure settings in the payment system and connect the module in BILLmanager.
| Payment methods support | ||||
|---|---|---|---|---|
| Bank cards | Cash | E-wallets | Mobile payments | Online banking |
| American Express, Discover, Mastercard, Visa. | PayPal Wallet | Apple Pay, Google Pay | Local payment methods (e.g., BLIK, iDEAL, Sofort) | |
| Supported features | ||||
Refunds | Recurring payments | Subscriptions | ||
Integration specifics
- Test mode is supported. See PayPal documentation for details.
Configuring the payment method
To integrate with BILLmanager, create a new application in PayPal:
- Log in to your PayPal Developer account.
- Go to Dashboard → REST API apps and click Create App. Copy the values from the Client ID and Secret fields for BILLmanager integration.
- Configure a webhook:
- Go to your app settings and find the Webhooks section.
- Click Add Webhook.
- In the Webhook URL field, specify a URL in the format
{billing domain or IP}/mancgi/ppexpandedresult. The IP address must be public. - Select the following events for notifications:
payment.capture.completed;payment.capture.declined;payment.capture.denied;payment.capture.pending;payment.capture.reversed.
- Save the settings and copy the Webhook ID — a unique identifier that allows PayPal to automatically send data to another web service. You will need it when configuring the PayPal Expanded payment module in BILLmanager.
- Enable required application features:
- Go to the Features section.
- Enable the following options:
- Apple Pay;
- Google Pay;
- Expanded checkout;
- Save payment method;
- Subscriptions;
- Invoicing;
- Payment links and buttons.
Configuring BILLmanager
To create a payment module, go to Provider → Payment methods → click Add :
- Payment module selection: "PayPal Expanded".
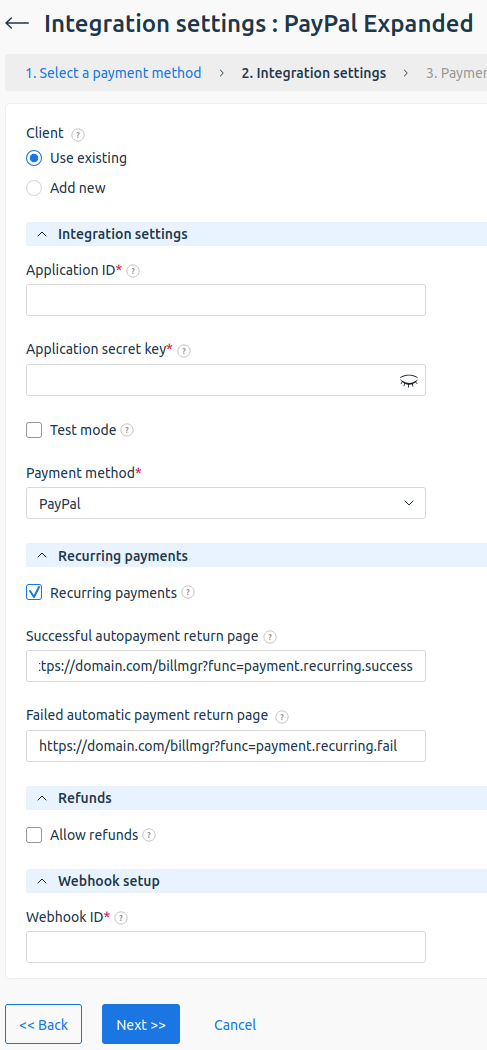
- Integration settings. Enter integration credentials.
Enable the Add new client option to display a registration link for the payment system.
Fill in the form using existing customer data from the payment system:- Application ID — unique application identifier. To find it, log in to your PayPal Developer account, go to Dashboard → REST API apps → application parameter Client ID.
- Private application key — application key for accessing the PayPal API. To find it, log in to your PayPal Developer account and go to Dashboard → REST API apps → application parameter Secret.
- Test mode — enables test mode for the payment module. In this mode, BILLmanager connects to the PayPal sandbox. To use it, create an account at developer.paypal.com.
- Payment method — select one or more payment methods available for this payment module.
- Recurring payments — enable this option to allow automatic replenishment and subscriptions. If enabled, specify:
- Successful autopayment return page — the page to which the payer is redirected after a successful recurring payment. Use the BILLmanager page
https://domain.com/billmgr?func=payment.recurring.successor a custom one; - Failed automatic payment return page — the page to which the payer is redirected after a failed recurring payment. Use the BILLmanager page
https://domain.com/billmgr?func=payment.recurring.failor a custom one.
- Successful autopayment return page — the page to which the payer is redirected after a successful recurring payment. Use the BILLmanager page
- Webhook ID — enter the PayPal Webhook ID you saved during PayPal-side configuration.
- Payment method settings. Configure internal (within BILLmanager) payment method parameters. See step 3 in the article Integration with payment gateways for details.
Additional information
Currencies
List of supported currencies. See PayPal documentation for details.
By default, some currencies are not supported for your account. To enable automatic acceptance of payments in an unsupported currency, activate the option in your PayPal account: Profile and Settings → My selling tools → Payment receiving preferences → Allow payments sent to me in a currency I don't hold. If this option is disabled, payments in unsupported currencies must be confirmed manually.
Fees
A fee is charged to the service provider for each financial transaction. See PayPal documentation for details.
Refunds
To enable refunds, go to Provider → Payment methods → Edit → enable the Allow refunds option. Refunds are supported for payments with the "Credited" status.
Logging
BILLmanager–PayPal Expanded Checkout interaction logs are written to the following files:
- /usr/local/mgr5/var/pmpaypalexpanded.log — payment method setup, refund, and saved-payment-method logs;
- /usr/local/mgr5/var/ppexpandedpayment.log — payment form opening and interaction logs;
- /usr/local/mgr5/var/ppexpandedresult.log — payment execution logs after the user enters payment details and clicks "Complete";
- /usr/local/mgr5/var/ppexpandedrecurring.log — saved payment method creation form opening and interaction logs;
- /usr/local/mgr5/var/ppexpandedrecurringresult.log — payment method saving logs after the client enters payment details and clicks "Complete";
- /usr/local/mgr5/var/ppexpandedredirect.log — log file for the transition from the payment page to the payment status page.